Service Information
Who can use it?
Students, Educators and Faculty
How to get it
Academic Bookings: UTS computer labs are primarily available for undergraduate classes.
All sporadic (one or several booking per term) academic bookings are done through the Campus Enterprise System: View Bookings
Service Availability
8:00AM-11:00PM 7-Days a week excluding University Holidays.
How much does it cost?
Academic bookings: There is no cost associated for undergraduate students.
Academic usage of the lab: The requester is responsible for cost of any faculty/course specific software applications and their licensing.
Location
UTS manages several computer labs located in 3 different buildings on campus:
- Burke Science Building (BSB) Rooms 241, 244, 249
- John Hodgins Engineering Building (JHE) Rooms 233, 234
- Kenneth Taylor Hall Building (KTH) Rooms B121, B123
The computer labs are available to all undergraduate students during the hours of operation. Specific lab rooms may be unavailable during course bookings.
Computer Labs – Virtual Desktop
If you have any questions, or are unable to resolve your issue, support can be received via the Service Desk.
Labs are being configured to allow for students to bring their own device and connect remotely, as well as shared devices. Students are advised to bring their devices as shared resources are limited. Instructions to connect your device are below.
Lab Bookings
There are two ways in which a lab can be booked for a specific course. The Registrar’s office manages bookings for Courses during the Academic Year.
- To submit a request online, go to the Service Desk Self Service page and log in.
- Select Computer Lab Requests
- Select Lab Booking Request
- Fill in all the details and then select Submit
- You will be advised when the lab has been booked for you.
What is Virtual Desktop?
Windows Virtual Desktop is a virtualization service that runs in the cloud.
Who can use it?
All UTS Computer Labs may be reserved for use by a class or group. Access to computers and courses will be available to students remotely. Priority is always given to academic (class related) reservations.
Service Availability
All labs are available daily (including Saturday and Sunday) 8:00 am to 11:00 pm. Limited availability 11 pm – 8 am.
Software Availability
Click the link below to view a comprehensive list of provided lab software.
Why use Virtual Desktop?
It gives you instant access 24/7 to a fully configured virtual university computer. You can use this service to access:
- A range of specialist software applications without the need to download on your personal or work device.
- Windows Virtual Desktop is a managed virtual desktop service that includes many security capabilities to keep your organization safe.
How to get it
To use the virtual desktop, you will need to install Microsoft Remote Desktop client (recommended) or use a web browser.
Select your Operating System below and follow the accompanying steps.
For instruction on how to book a UTS computer lab
Installing Virtual Desktop

Get Virtual Desktop for Windows
Windows
- Download and install Microsoft Windows App
- Once installed, open Windows App.
- Sign in with your University email address (macid@mcmaster.ca) and password when prompted.
- Double click the relevant desktop that is presented to you.
- Enter your University email address and password to start the desktop.
- You will now see the Virtual Desktop starting up.
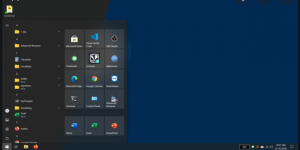
The software can be found by clicking on the Windows 10 Start Menu.

Apple macOS Steps for Mac
Note: Applies to: macOS 13.0 or later.
Get Virtual Desktop for Mac
Apple macOS
- Download and install Windows App from the Mac App Store. When Windows App is installed, open it.
- Windows App opens on the Devices tab. Select the plus (+) icon, then select Add Work or School Account.
- Enter your University email address (macid@mcmaster.ca
 ), click Next
 - Enter your password, click Sign In
- Double click the relevant desktop that is presented to you.
- Enter your University email address and password to start the desktop.
- You will now see the virtual desktop starting up

Get Virtual Desktop for Android
Android
- Get the Remote Desktop from the Google Play Store
- Once installed, open Remote Desktop app
- Tap the + sign in the top right corner of the screen
- Click Add Workspace
- Enter this URL: https://rdweb.wvd.microsoft.com/api/arm/
feeddiscovery - Click Add
- Enter your University email address (macid@mcmaster.ca), click Next
- Enter your password, click Sign in
- Double click the relevant desktop that is presented to you
- Enter your University email address and password to start the desktop
- You will now see the virtual desktop starting up

Dell Wyse Thin Client
- Please login using your MacID@mcmaster.ca
- Enter Password
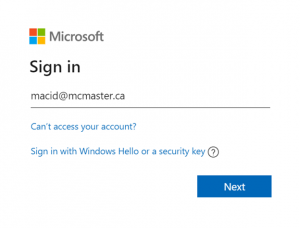
- This will log you into the McMaster Azure Virtual Desktop (AVD) Portal. The McMaster AVD desktop you are authorized to access will be listed – located on the left had side of the screen
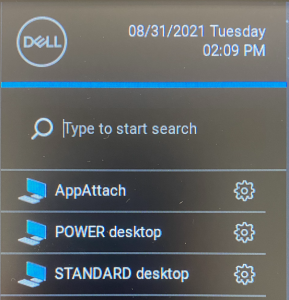
- Select either the STANDARD / Power icon by double clicking. It will take longer to load the AVD desktop the first time you use it.
- You will be prompted to enter your MacID and Password once again for authentication.
NOTE: Please do not enter any (Domain) information
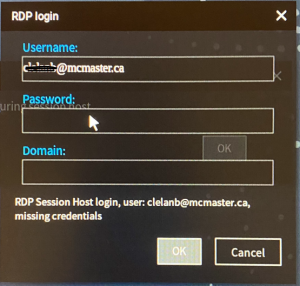
- Click OK
- The full desktop containing applications will load.
Get Virtual Desktop on your Web Client
Web Client

- In a browser, navigate to Windows Virtual Desktop web client at https://client.wvd.microsoft.com/arm/webclient/index.html
- Sign-in using your University email address (macid@mcmaster.ca), hit Next
- Enter your password, hit Sign in
- Click on the relevant desktop that is presented to you
- Enter your University email address and password to start the desktop
- You will now see the virtual desktop starting up
