General Information
Did you know running the latest versions of the apps you use (like Email, Teams and Zoom) help keep your cyber security strong? Click here to make sure you are running the latest version!
Graduated students, employees, affiliates and retirees moving on from McMaster University are advised to download Zoom cloud recordings from their McMaster Zoom account that they wish to keep before leaving. See How do I download Zoom Cloud recordings.
Access to Zoom services will be removed immediately upon your departure from McMaster University.
Who can use it?
Staff, Students and Faculty
How much does it cost?
This service is free.
How to get it
Sign in with your MacID@mcmaster.ca and your MacID password to activate your zoom license account.
*NOTE: Failing to sign in via the McMaster portal or without your MacID will prevent the use of features such as breakout rooms.
Service availability
24/7
Is Zoom the right application for you?
While licenses are available for the campus community, UTS strongly recommends that students, staff and faculty members use Microsoft Teams for any sessions or interactions containing sensitive information.
When selecting a web and video conferencing platform, please view our ‘Features & Use Cases’ comparison table, which shows the strengths, accessibility and security levels of each McMaster-provided tool.
General Information
For all general information regarding Zoom please refer to the Zoom Quick Start Guide for New Users
Logging in through the Desktop Zoom App
- Go to https://zoom.us/download
- Locate the Zoom client for Meeting and select download. The site will automatically detect your operating system and download the proper version.
- Install the software and launch it.
- At the log in screen, Select “Sign in with SSO”
- Enter the comapny or domain as “McMaster”, then Continue
- Enter your MacID followed by @mcmaster.ca. Press Next
- Enter your MacID password. Press Next
- The Zoom desktop application will then be logged in and you may commence using the application.
Logging in through the Mobile Zoom App
- Go to https://zoom.us/download
- Locate the Zoom Mobile Apps and select download for the type of device.
- Install the software and launch it.
- At the log in screen, Select “Sign in with SSO”
- Enter the comapny or domain as “McMaster”, then Continue
- Enter your MacID followed by @mcmaster.ca. Press Next
- Enter your MacID password. Press Next
- The Zoom desktop application will then be logged in and you may commence using the application.
News & Updates
Information Box Group

Zoom Security Vulnerability – Minimum version upgrade on December 4
Service Updates, Zoom
November 26, 2025

Zoom Security Vulnerability – Minimum version upgrade on September 18
Service Updates, Zoom
September 10, 2025

Zoom Security Vulnerability - Minimum version upgrade on August 7
Service Updates, Zoom
July 30, 2025

Zoom Security Vulnerability - Minimum version upgrade on April 21
Service Updates, Zoom
April 16, 2025

Zoom Security Vulnerability - Minimum version upgrade on January 16
Service Updates, Zoom
January 14, 2025
Securing your Meeting
Zoom bombings have increased due to meetings links posted publicly on social media and without security features enabled. To ensure your safety and security, the information on this page will help you create online meetings that are protected and secure from unwanted and nefarious guests.
McMaster has implemented a change to improve the security of all scheduled Zoom meetings. As of May 2, 2022, all newly scheduled Zoom meetings must be secured with at least one security option.
Security options for meetings include:
Waiting room
Passcode
Authenticated users only
Registration (for events).
What do I need to do?
All new meetings will have the waiting room enabled as the default security option. Individuals can change their meeting defaults or per each meeting as required. Previously scheduled meetings will not be affected.
Why the change?
This feature will add an extra layer of security to prevent ‘Zoom bombing’ and nefarious interference with McMaster Zoom meetings.
Information Box Group
Top Five Zoom Tips
- Always sign into your McMaster Zoom account via SSO: https://mcmaster.zoom.us/
- Make sure you activate all updates on your device before joining or starting meetings/webinars
- Set up secure meetings
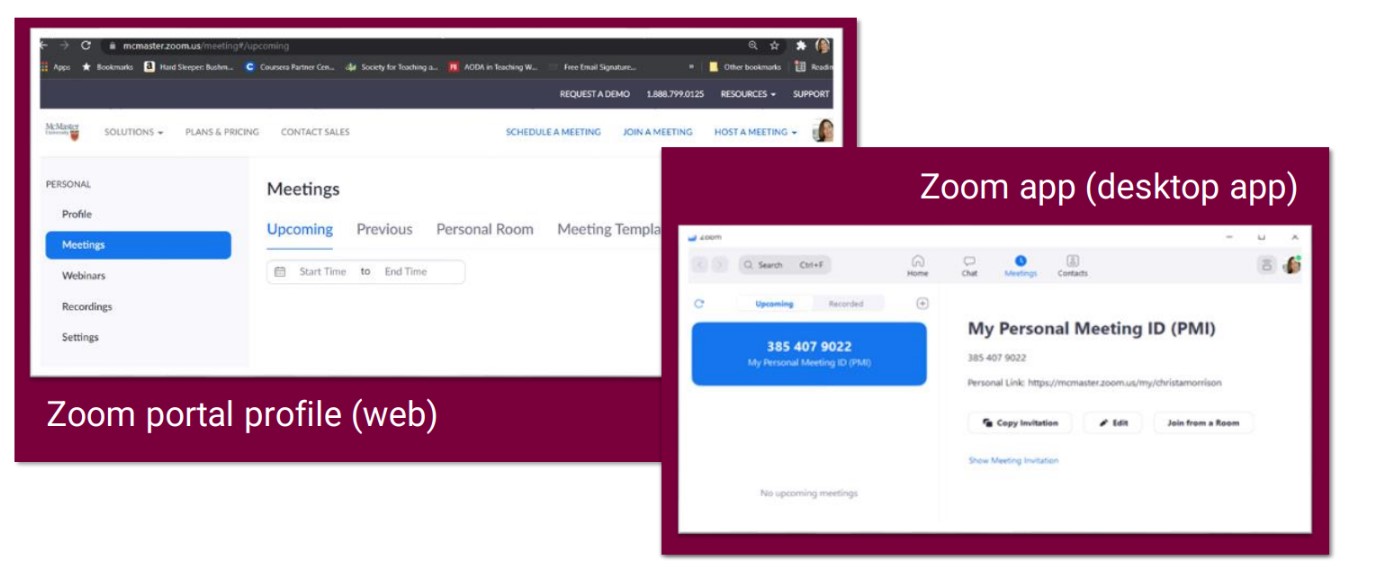
- Familiarize yourself with your browser portal profile and the Zoom desktop app
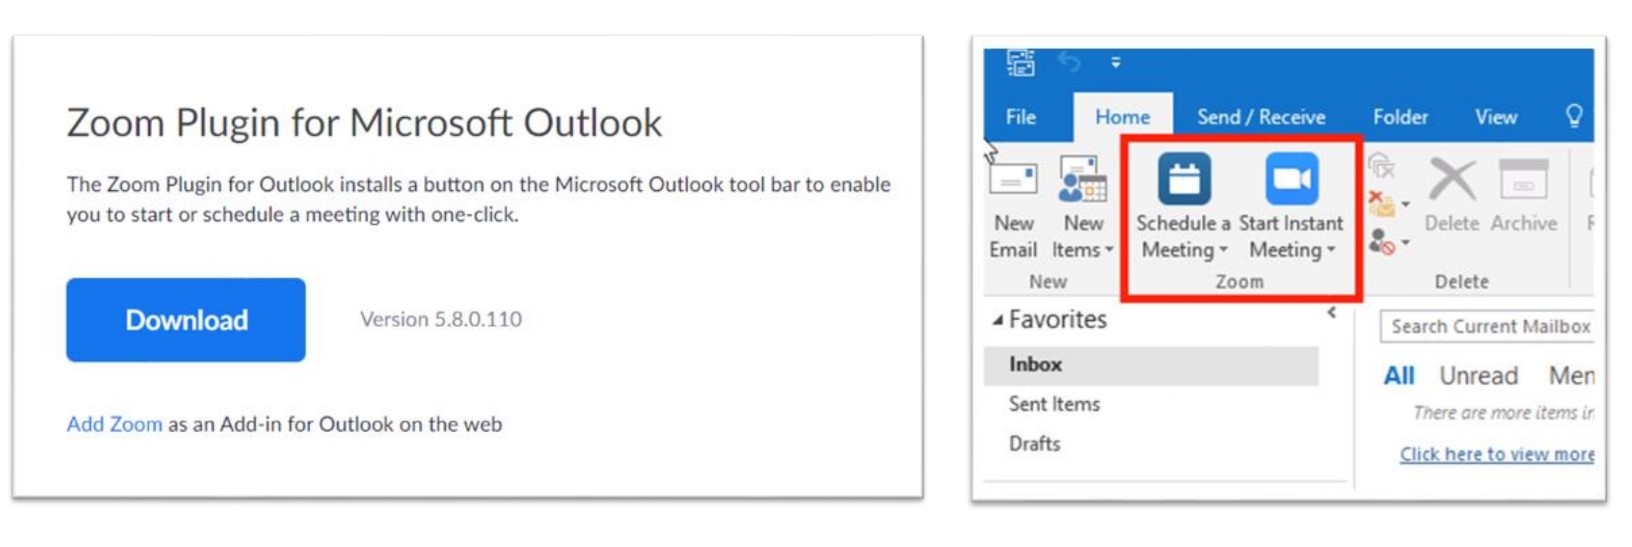
- Make use of the Zoom add-on features in Outlook
Zoom Security
(Before, During, and After the Meeting)
After reading these tips, you’ll be able to create most secure zoom meetings and drastically recreate the likelihood of any unforeseen meeting interruption.
Expandable List
Never post your meeting URL or password in a public forum
To prevent unwelcome visitors from joining your meeting, it is important to protect your meeting URL and ensure that only legitimate participants have access to it. If you would like to invite the public to join your meeting, it is better to have them register to join (see below).
Don’t use your Personal Meeting ID for scheduled meetings
Your Personal Meeting ID is very useful for instant meetings and when people want to contact you one-on-one but should not be used for scheduled meetings. Generate a random Meeting ID for scheduled meetings.
Learn more about using your Personal Meeting ID.
Require participants to authenticate
For any meeting that includes only participants that have McMaster credentials, require that they authenticate at https://mcmaster.zoom.us before joining.
Learn more about Authentication for Meetings.
Require a password to join
For small to medium sized meetings that will include people that may not have McMaster credentials, require a password to participate.
Learn more about Meeting Passwords.
Require participants to register
For larger meetings that will include participants that do not have McMaster credentials, require that people register before the meeting and check in.
Learn more about Registration for Meetings.
Use the Waiting Room
The waiting room will help you to manage who is able to join your class, seminar or meeting, and when they are able to join.
Make someone your co-host
It can be difficult to manage meeting participants during a large meeting when you are also trying to facilitate discussion and collaboration. Enlist someone you trust to be your co-host and have them monitor the Waiting Room and manage the meeting participants.
Learn more about assigning a co-host.
Lock the meeting
When you are sure that all attendees are present, or you have reached an expected cut-off time for participants to join, lock the meeting to prevent unwelcome visitors from joining.
Learn more about locking the meeting.
Mute all participants
When you are presenting you can mute all participants with the touch a of a button to prevent unwanted interruptions.
Control screen sharing
Prevent others from sharing the contents of their screens by requiring that they ask permission before doing so.
Learn more about controlling screen sharing.
Disable private chat
Disabling private chat is a great way to prevent participants from receiving unwanted messages during a meeting.
Learn more about controlling and disabling in-meeting chat.
Disable annotation
Annotation can be a very useful tool to enhance collaboration during meeting, but also presents an opportunity for mischief. Disable annotation to prevent abuse.
Remove participants
As host or co-host, you can remove any participant at any time.
Recording classes, seminars and meetings can be beneficial both from an accessibility perspective, to provide a resource to those that were unable to attend the meeting, and to retain a record of the meeting. This record can be very beneficial in the event that the meeting is disrupted by unwelcome participants.
Storing recordings
Meeting recordings can be stored locally or in the cloud. Recordings stored in the cloud are managed by Zoom data centres in Canada. Only licensed hosts can save recordings to the cloud.
Hosts can also save meeting recordings on their local computer.
Learn more about recording to the cloud.
Learn more about recording locally.
Participant recording
Participants can record meetings and store them on their local computer. Hosts are encouraged to control this capability by requiring that participants ask permission before they record.
Zoom Basics & Breakout Rooms
After reading these tips, you’ll be familiar with:
1. Good practices for a seamless Zoom experience
2. Scheduling meetings in Zoom
3. Using Breakout Rooms in Zoom
4. Support options
Expandable List
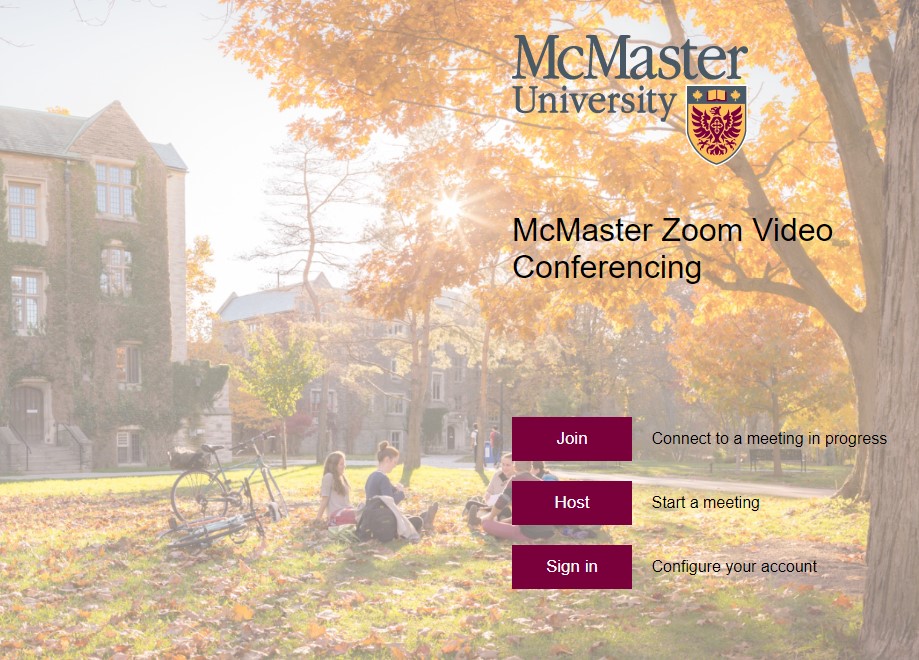
Use your macID@mcmaster.ca email and choose SSO (single sign-on)
Sign in right here via mcmaster.zoom.us
Zoom releases updates and minor fixes for reported bugs on a regular basis and
recommends that users stay current with the latest version of Zoom to leverage any
new functionality and security features.
UTS will release the latest version of the Zoom client to all users once a month.
You’ll be prompted to install the updates prior to using Zoom. Allow time to do this
before starting or joining meetings.
Check updates manually:
1. Download the Zoom Desktop App
2. Sign in via SSO
3. Click on your Profile
4. Check for Updates
Learn the difference between the Zoom web portal profile and the Zoom desktop app.
Starting and stopping meetings from Outlook is easy and convenient. Find complete details on the official Zoom site.
How to Schedule Meetings
Below you’ll find information on how to:
1. Schedule a recurring meeting
2. Add or remove a co-host/multiple co-hosts
3. Lock & unlock a meeting
4. Admit people from the waiting room
5. Activate a waiting room
Expandable List
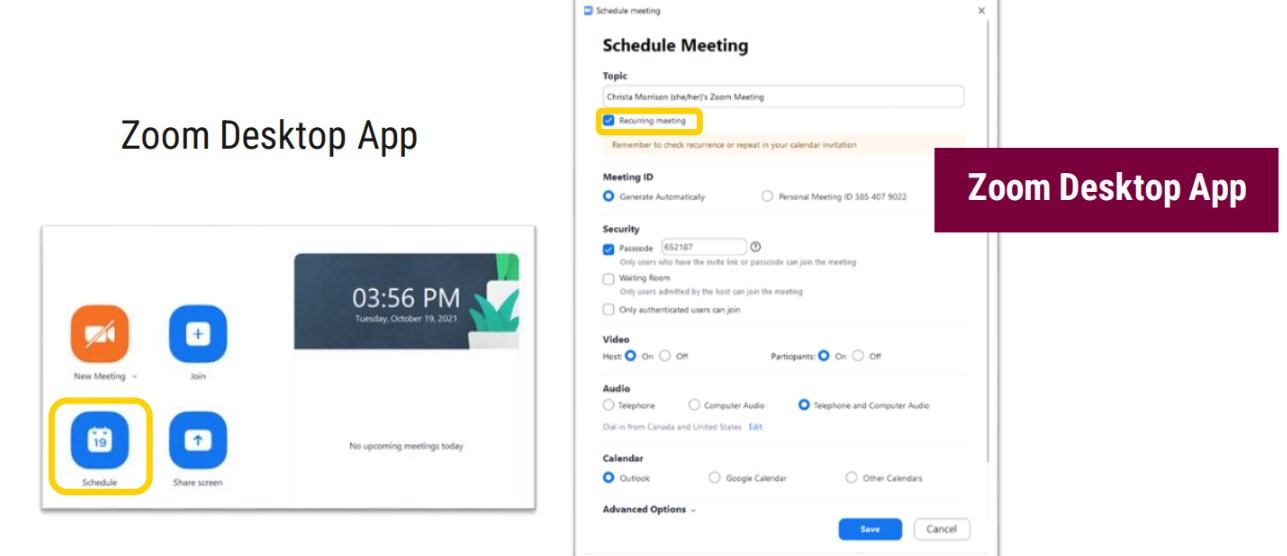
How to Schedule a Recurring Meeting via Zoom app.
1) Click the ‘Schedule’ button after launching the app
2) Ensure to tick the ‘Recurring meeting’ check box below the topic field (see below)
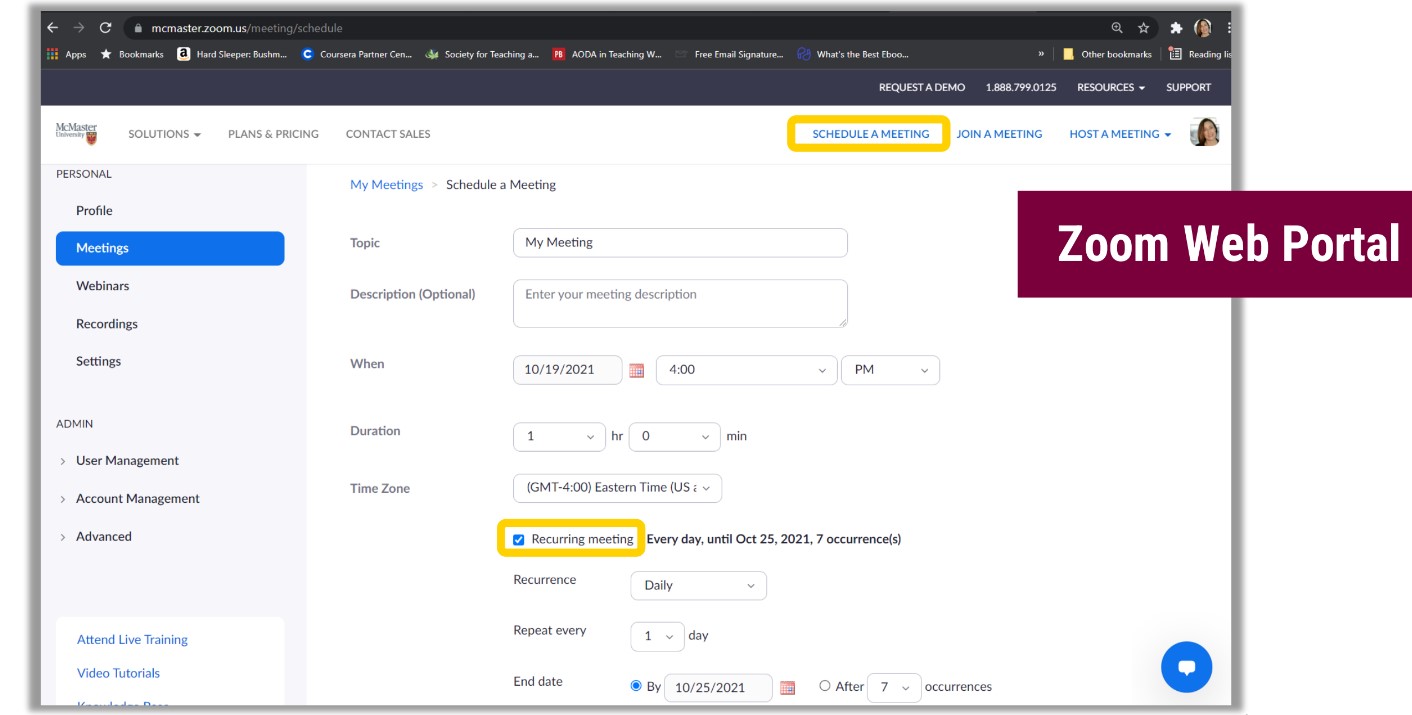
How to Schedule a Recurring Meeting via Zoom web portal
1) Click the meetings tab in the left-hand task bar
2) Ensure to tick the ‘Recurring meeting’ check box below Time Zone field (see below)
How to add a co-host before a meeting
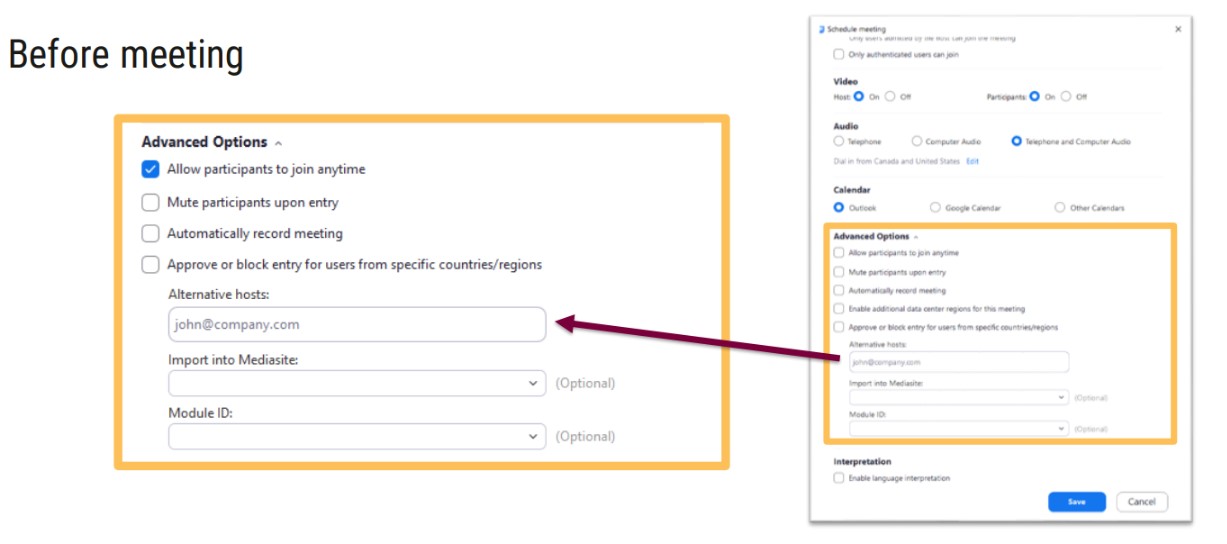
1) Open the ‘schedule a meeting’ tab
2) Ensure to tick the ‘allow participants to join anytime’
3) Enter the email address of the co-hosts in the ‘Alternative Hosts’ field
How to add a co-host during a meeting:
Method 1
1. Hover over a user’s video
2. Click the ellipsis icon
3. Click Make Co-Host.
Method 2
1. Using the participants window:
2. Click Participants in the meeting controls at the bottom of the Zoom window.
3. Hover over the name of the participant who is going to be a co-host, and choose More.
4. Click Make Co-Host.
5. Once a participant has been made a co-host, they’ll have access to the co-host controls.
In-meeting security settings overview:
When in a meeting, the host or co-host can check what security settings were enabled for this
meeting. These settings cannot be changed, but are meant to provide quicker and easier access to
this information.
To access this list:
– Start a Zoom meeting as the host or co-host
– Click the green encryption icon in the top-left corner of the video window
– Click ‘Security Settings Overview’
– A window will open, listing all settings related to meeting security and if they are currently enabled for this session
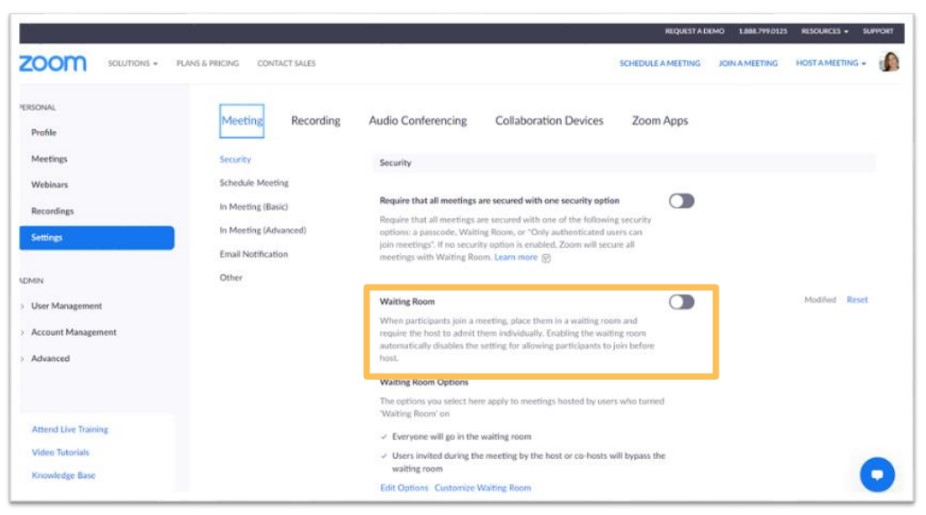
-On the left side navigation bar, click “Settings”
– Select “Meeting”
– Toggle on ‘Waiting Room’
Visit the official ‘use waiting room’ Zoom page for more
How to Manage Breakout Rooms
Below you’ll find information on how to:
1. Set up rooms in advance & Open/Close rooms
3. Send messages to the breakout rooms
4. Set a timer for the breakout rooms
5. Add people to a breakout room once a meeting starts
Expandable List
Setup Rooms in Advance
The process for setting up rooms in advance depends on several factors, such as device and browser. Click the link below for need-to-know information on how to access these features.
Official Microsoft Zoom page for managing breakout rooms.
Open and Close Rooms a During
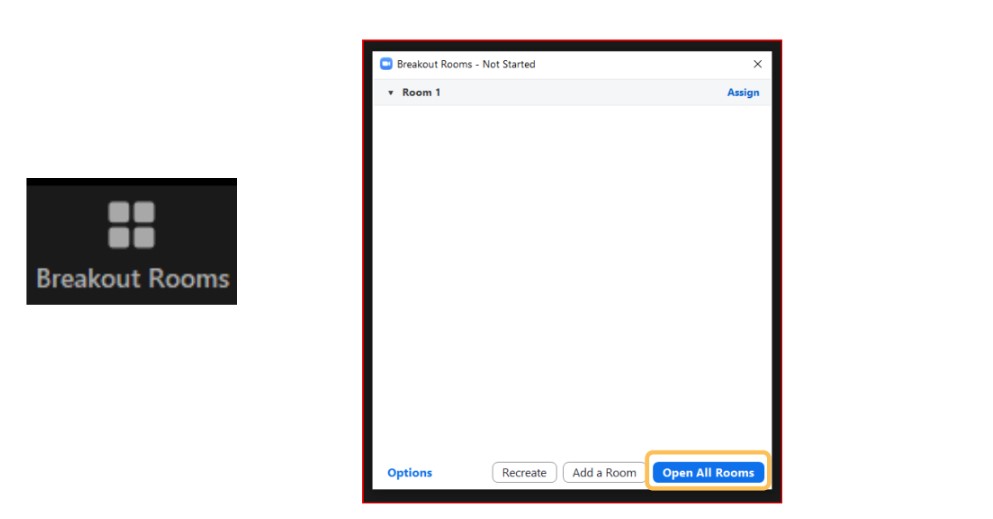
1) Click the breakout room tab located on your screen
2) Click the ‘open all rooms’ button located on the bottom of the breakout room window (see below).
The host or co-hosts can broadcast a message to all breakout rooms to share information with all
participants. (This can be done from the main session or from within a breakout room.)
1. Click ‘Breakout Rooms’ in the meeting controls
2. Click ‘Broadcast Message to All’, enter your message, and click ‘Broadcast’
3. The message will now appear for all participants in breakout rooms
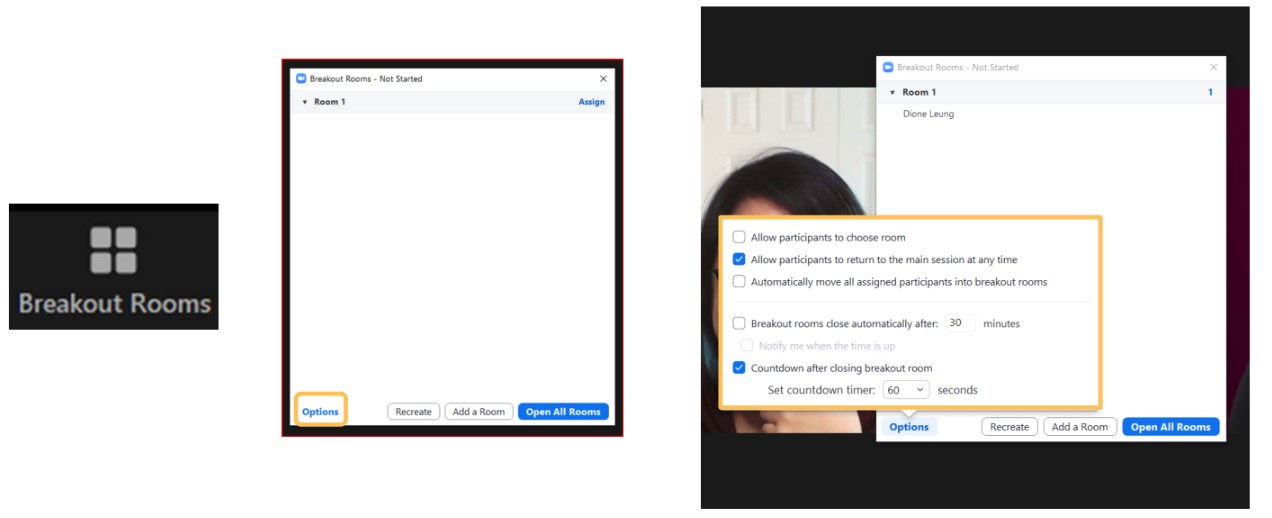
1) Open ‘Breakout Rooms’ tab
2) Click ‘Options’ in bottom left corner of window
3) Select your parameters in the pop-up window
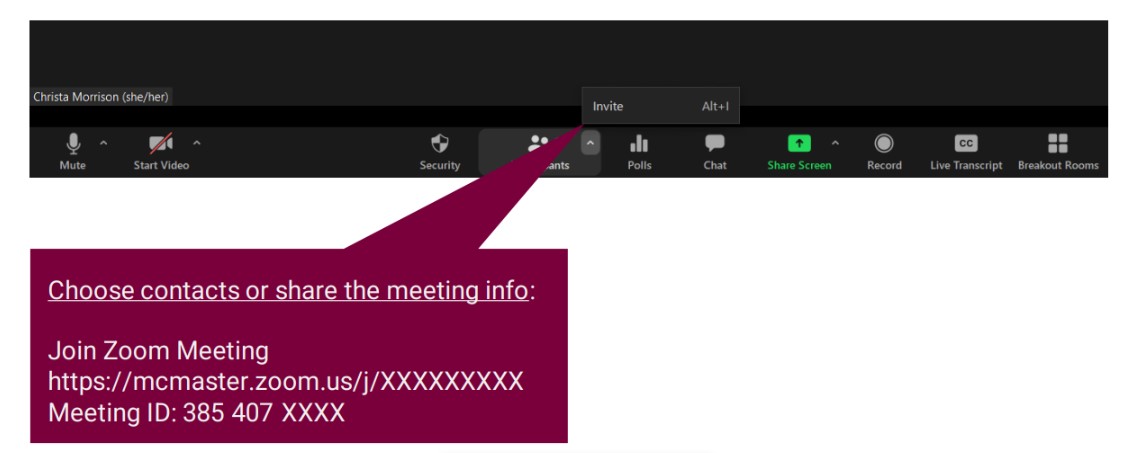
1) In the meeting controls, click the up arrow in the corner of the ‘participants’ tab
2) Copy the meeting information and share
Tips:
Tip 1: Hosting an event? Consider setting up Meeting Registration to have participants signup and receive an email with the Meeting link and passcode instead of sharing it to Twitter or in other public spaces, which can be searched easily by bots and villains.
Tip 2: Have at least one security option enabled, such as the Waiting Room, Passcode, and Enabling Authenticated Users Only.
Tip 3: Familiarize yourself with the In-Meeting Security options. For example, if you have an unauthorized guest in your meeting, you can use the “Suspend Participant Activities” option which will turn off all participant video, audio, screenshares, etc. From here, you can switch to the Participants tab and remove unwanted guests.
Tip 4: Check and adjust meeting settings before the meeting. You can adjust the meeting settings before a meeting starts to prevent participants from sharing their screen or from turning on their camera or microphone.
Resources:
1: Visit Zoom’s help center on In-Meeting security options
2: Schedule Meetings with registration
3: Check and manage Meeting Settings
4: Sign-in, news and updates on the McMaster Zoom Hub
5. Learn how to use Zoom on our Discover M365 & Zoom Site
6. Join the Zoom Community of Practice
7. Contact UTS Client Services for technical issues
Training
Zoom is a video conferencing platform that can host up to 300 guests for McMaster licensed accounts
Information Box Group

Book Customized Zoom Training Sessions or Consultations Book a Consultation
Book Snack Meetings/Consultations/Customized Training Sessions with McMaster Business Systems Specialist Christa Morrison.

Access Zoom Support Centre Zoom Support Centre
Explore a variety of support resources including articles, videos, and live assistance to help you with all your Zoom needs.
Whether you’re scheduling meetings, troubleshooting issues, or learning new features, the Zoom Support Centre is here to assist you.
Zoom FAQ’s
Expandable List
It is possible to appoint a delegate to book meeting on your behalf. However, the delegate must have a licensed account. Basic accounts are not eligible to act as delegates. To appoint a delegate
- Log into https://mcmaster.zoom.us,
- On the left panel select Settings
- Under the heading of Meeting at the top, select Other.
- Under the heading Scheduler Privilege, select the + symbol beside “assign scheduling privilege”.
- Enter the McMaster macid@mcamster.ca for the people to be assigned as delegates, then click on assign.
You can also view for whom you have been given delegate access.
- Sign into McMaster.zoom.us to access your cloud recordings.
- Click on Recordings in the left sidebar.
- Click on Cloud Recordings.
- Select the recorded Zoom events you wish to download.
- Click on the ellipsis and select Download.
- Click on Download to confirm.
You do not have access to Zoom It is recommended that you download Zoom cloud recordings that you wish to keep in advance before the end of your program or work agreement with the university.
Please refer to the Zoom Blog page for information on preventing uninvited users from interrupting your Zoom conference. Otherwise known as Zoom bombing.
Students may be a participant in any Zoom meeting to which they are invited without any time restrictions and without the need for a license. Students who need to organize and host meetings with classmates or instructors are encouraged to use Microsoft Teams as the tool of choice.
It is strongly encouraged that prior to your first Zoom meeting, you review the Zoom Video Conferencing Best Practices for Privacy and Security.
For accessibility questions visit the McMaster Accessibility Hub.
Role Based accounts are not eligible for a Zoom license account or basic user account in the McMaster instance.
