Windows
Requirements: Latest System Updates (Control Panel – Windows Updates). Important – WPA is a newer protocol and ensuring your system is up to date is essential for it to work properly
Information Box Group
Windows 11 - Automatic set up
- From Taskbar, click on the Wireless Icon in the System Tray.

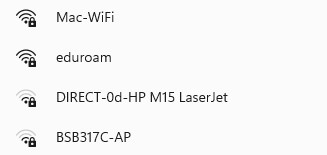
- From the popup sidebar, click on Mac-WiFi
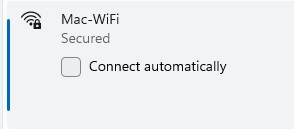
- Click on Connect automatically checkbox & hit Connect.
- Enter your MacID & Password. Hit OK.
- Hit Connect.
- You should now be Connected to Mac-WiFi.

Windows 11 – Manual Setup
1. From Control Panel, click on View network status and tasks.

2. Click the option Set up a connection or network.

3. Under Choose a connection option click the selection Manually connect to a wireless network, then click Next.

- Network Name: Mac-WiFi/Reznet-WiFi/eduroam (Case-Sensitive)
- Security Type: WPA2-Enterprise
- Encryption Type: AES
- Security Key/Passphrase: Blank
Click Next to continue.

4. Once you receive Successfully added Mac-WiFi, click the option Change connection settings.

5. At the Mac-WiFi Wireless Network Properties screen under Security Tab, click Settings. If you do not want this computer to remember your MacID and password, click off the Remember my credentials for this connection each time i’m logged in. Doing this means you have to type your MacID and password each time you connect.

6. At the Protected EAP Properties place a check beside the box Connect to these servers. Enter wireless.mcmaster.ca as the certificate name exactly as shown. Under Trusted Root Certification Authority, pick the certificate COMODO RSA Certification Authority.
Finally, click the Configure button.

7. Under EAP MSCHAPv2 Properties, uncheck the Automatically use my Windows logon name and password (and domain if any). Click OK, then click OK a second time.

8. Now connect to Mac-WiFi using your credentials (MacID & Password).
Forgetting a Network
Try ‘forgetting’ a wireless network when troubleshooting network problems or if you have recently changed your MAC ID password. This article provides instructions on how to forget a wireless network on various operating systems and device types.
Follow these instructions to remove Mac-WiFi or eduroam networks from your device.
To forget a wireless network in Windows 11:
- At the bottom right in the system tray, click the wireless network icon, then the gear icon in the bottom right.
- Click ‘Network & internet’
- Click ‘Wi-Fi’
- Click ‘Manage known networks’, then click ‘Forget’ beside Mac-Wifi
Information Box Group
Windows 10 - Automatic set up
- From the taskbar, click on the Globe icon in the system tray.

2. From the popup sidebar, click on Mac-WiFi.
3. Under ‘Username,’ enter your MacID. Enter the corresponding MacID password in the field below. Click OK.

4. If you receive a prompt saying, ‘Continue connecting’, click Connect.
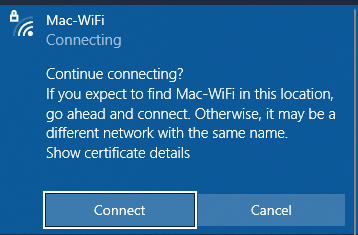
5. A message like this should appear in a few seconds.
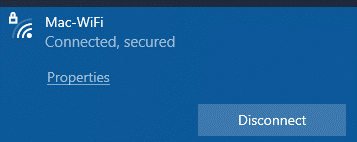
Success! You are now connected to the Mcmaster Wi-Fi network.
Windows 10 - Manual set up
1. From Control Panel, click on View network status and tasks.
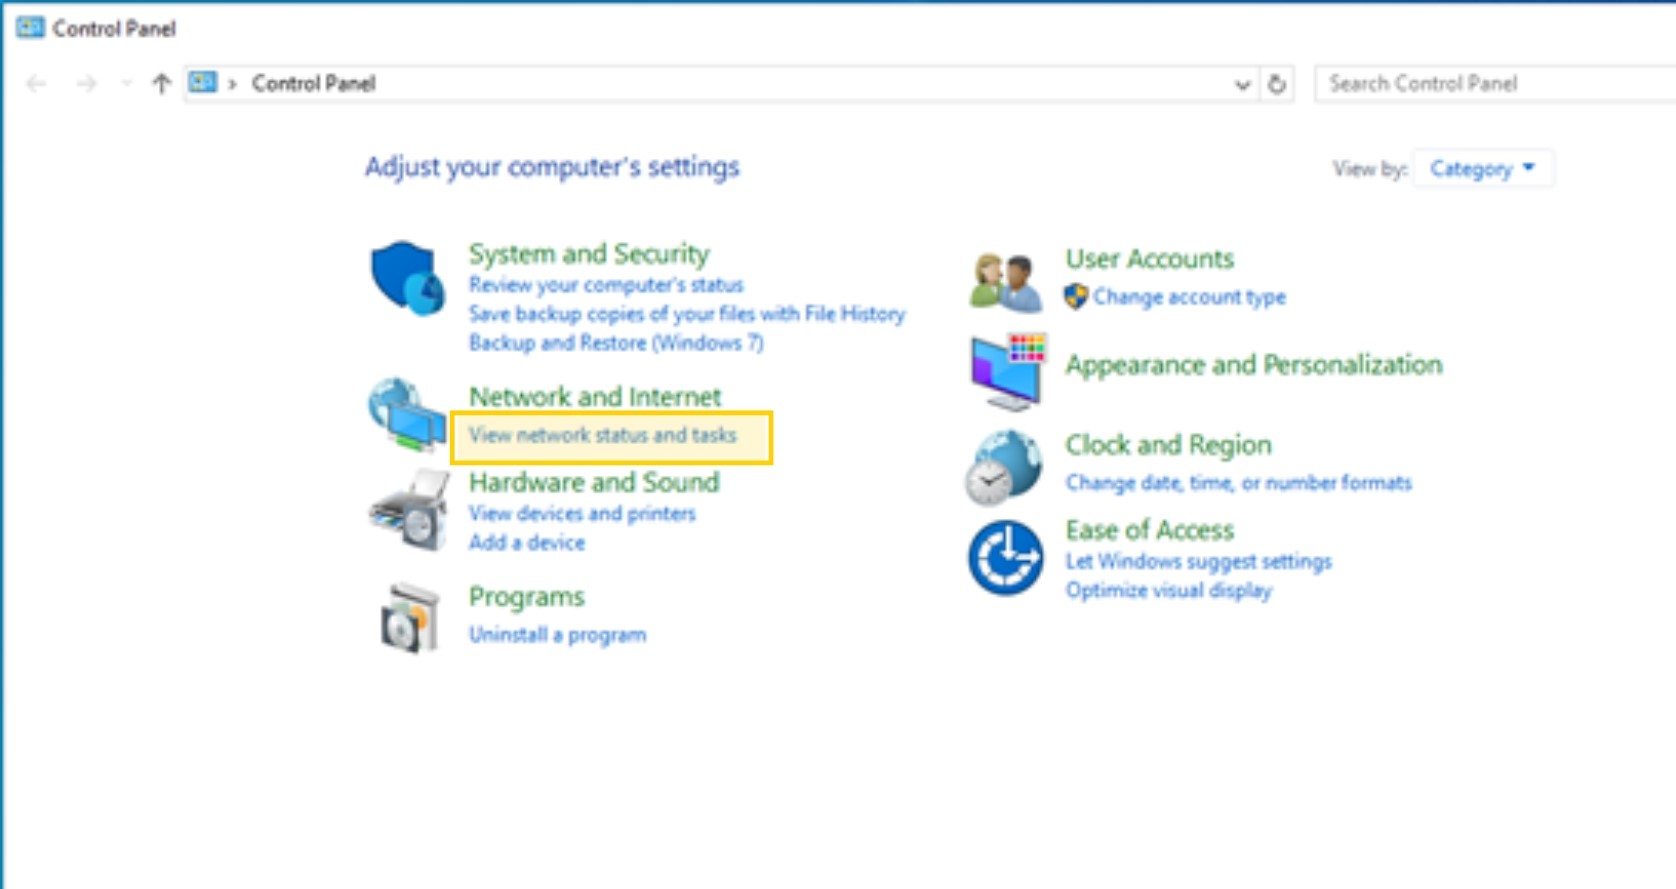
2. Click the option Set up a new connection or network.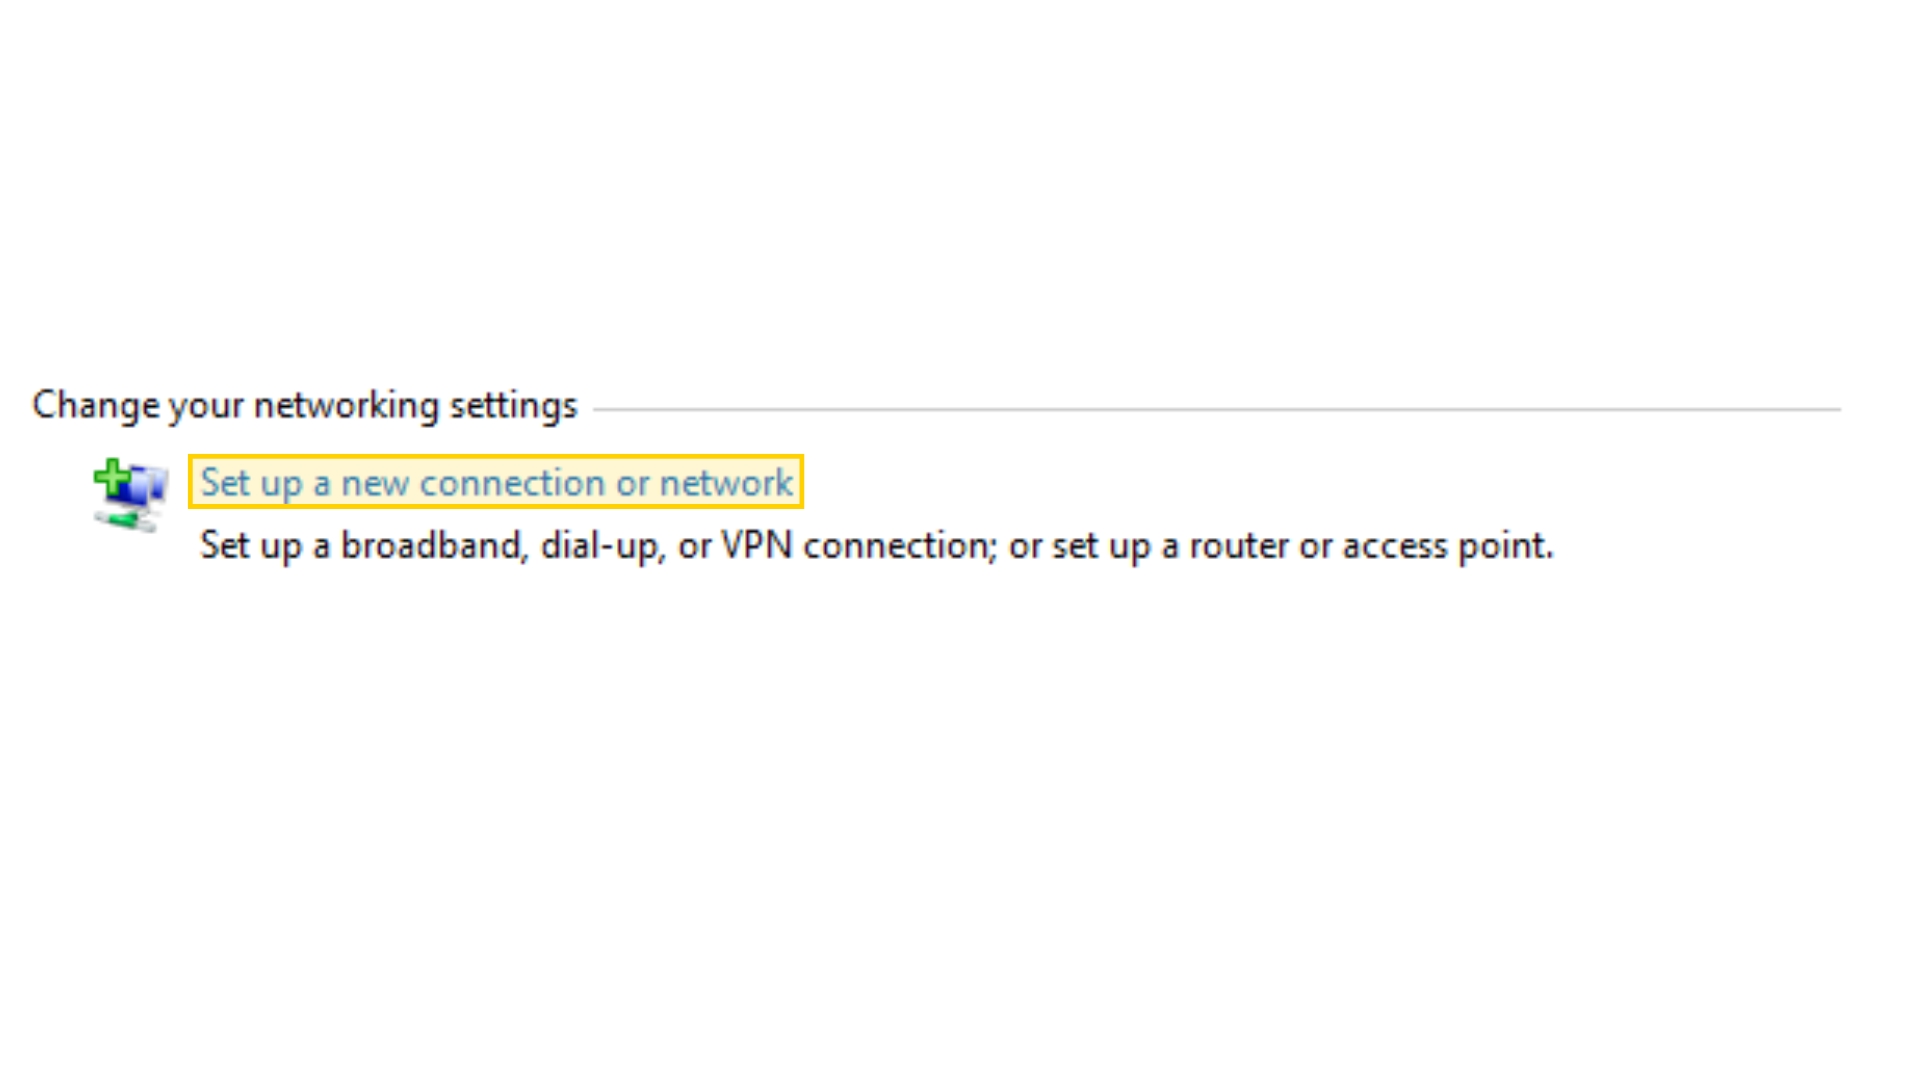 3. Under Choose a connection option click the selection Manually connect to a wireless network, then click Next.
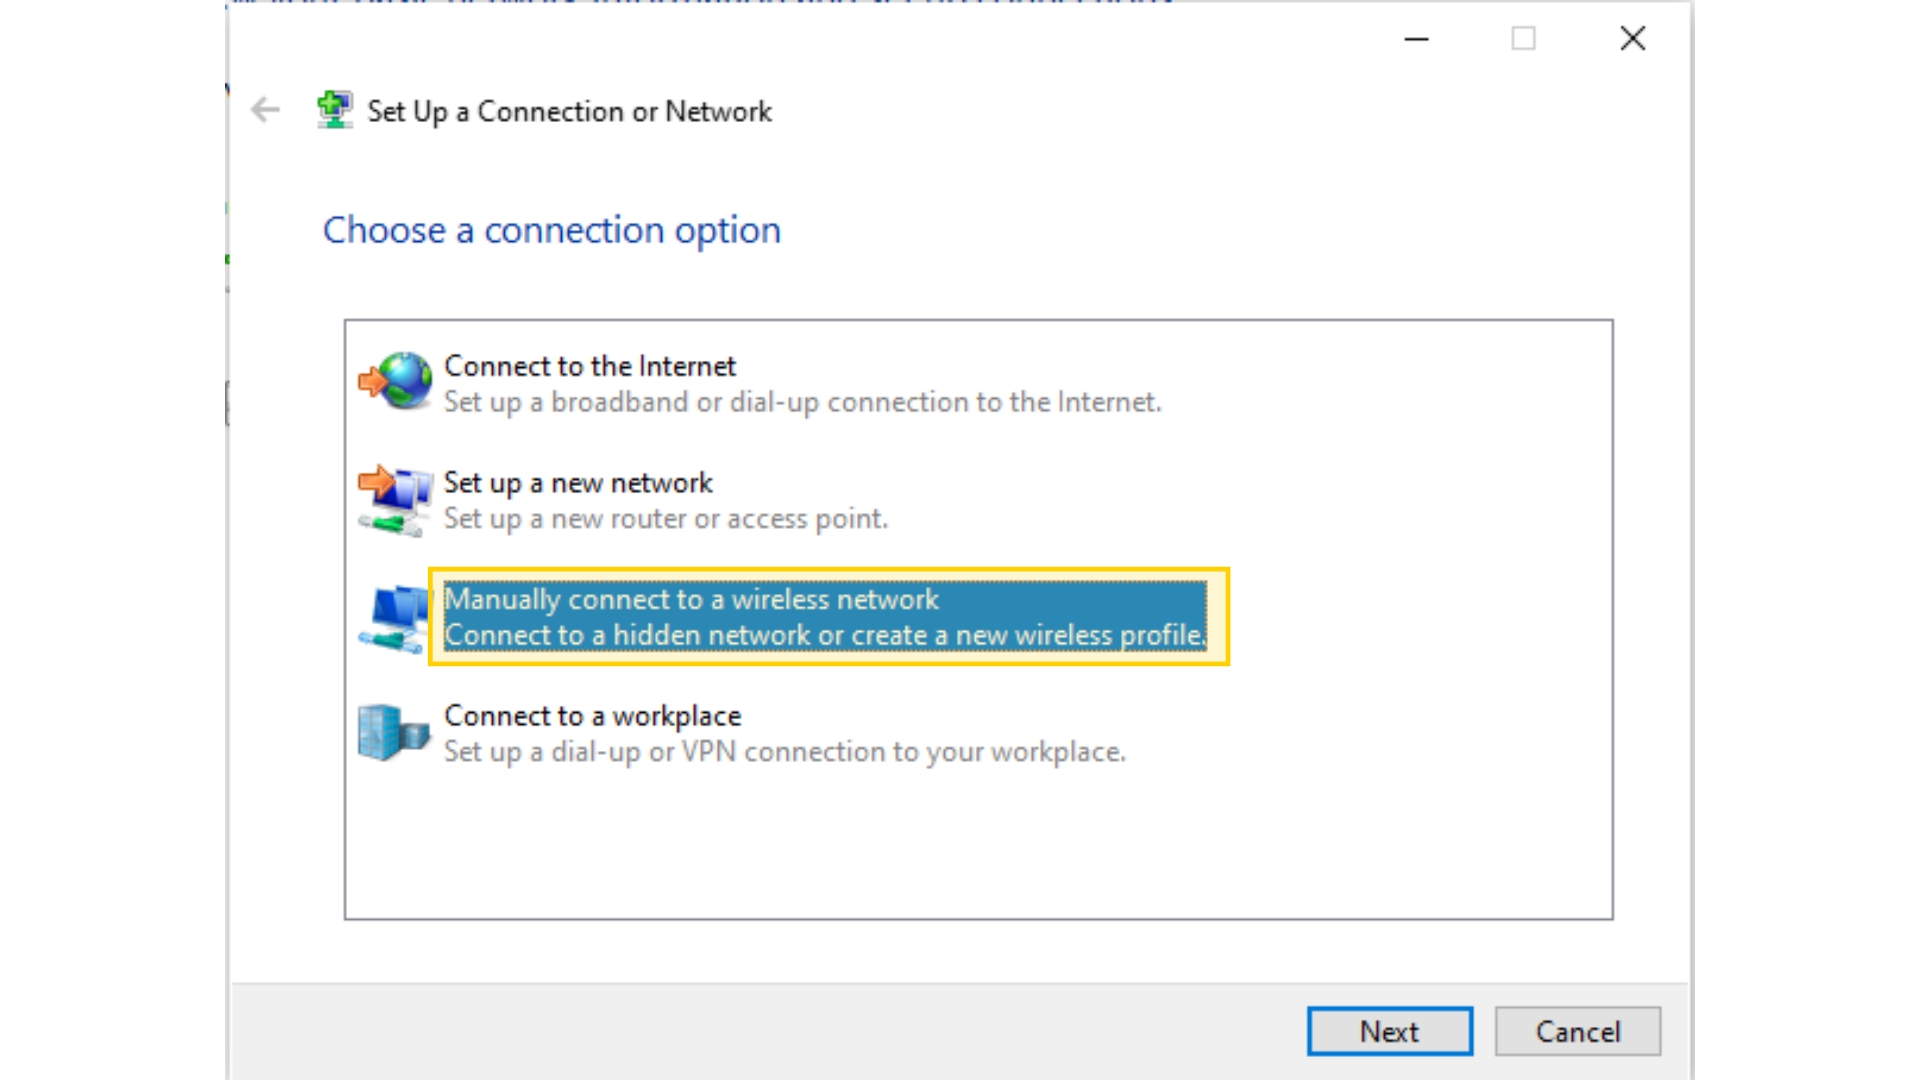
At the Enter information for the wireless network you want to add match the options as shown:
- Network Name: Mac-WiFi/Reznet-WiFi/eduroam (Case-Sensitive)
- Security Type: WPA2-Enterprise
- Encryption Type: AES
- Security Key/Passphrase: Blank
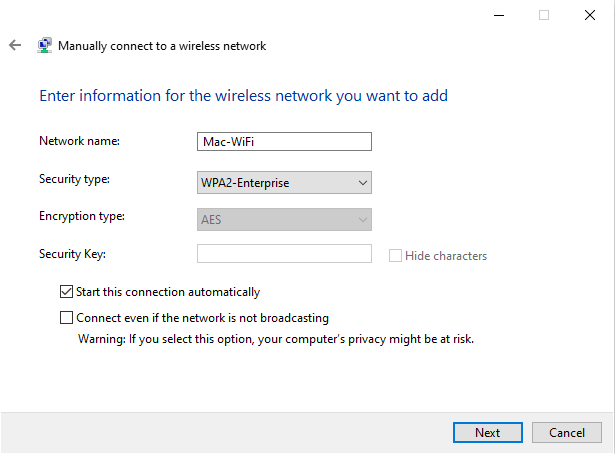
Click Next to continue.
4. Once you receive Successfully added Mac-WiFi, click the option Change connection settings.
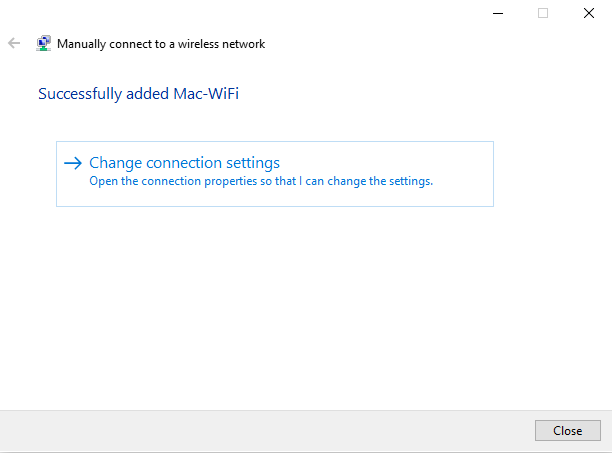
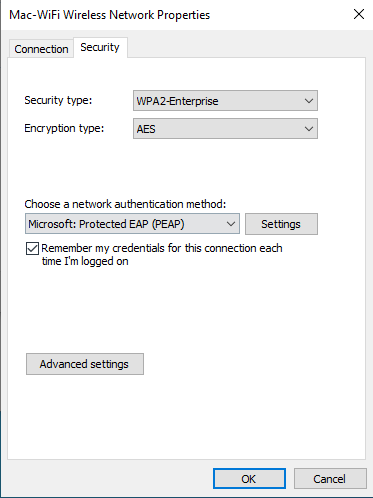
5. At the Mac-WiFi Wireless Network Properties screen under Security Tab, click Settings. If you do not want this computer to remember your MacID and password, click off the Remember my credentials for this connection each time i’m logged in. Doing this means you have to type your MacID and password each time you connect.
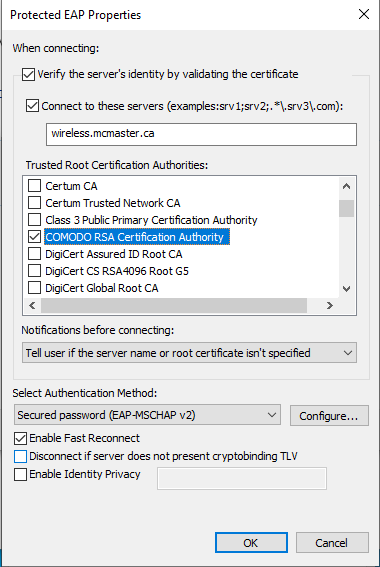
6. At the Protected EAP Properties place a check beside the box Connect to these servers. Enter wireless.mcmaster.ca as the certificate name exactly as shown. Under Trusted Root Certification Authority, pick the certificate COMODO RSA Certification Authority.
Finally, click the Configure button.
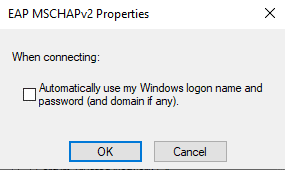
7. Under EAP MSCHAPv2 Properties, uncheck the Automatically use my Windows logon name and password (and domain if any). Click OK, then click OK a second time.
8. Now connect to Mac-WiFi using your credentials (MacID & Password).
Linux
How to Connect to Wi-Fi
Ubuntu Setup:
1. Click on the top right hand corner wireless icon and select Connect to Hidden Wi-Fi Network.
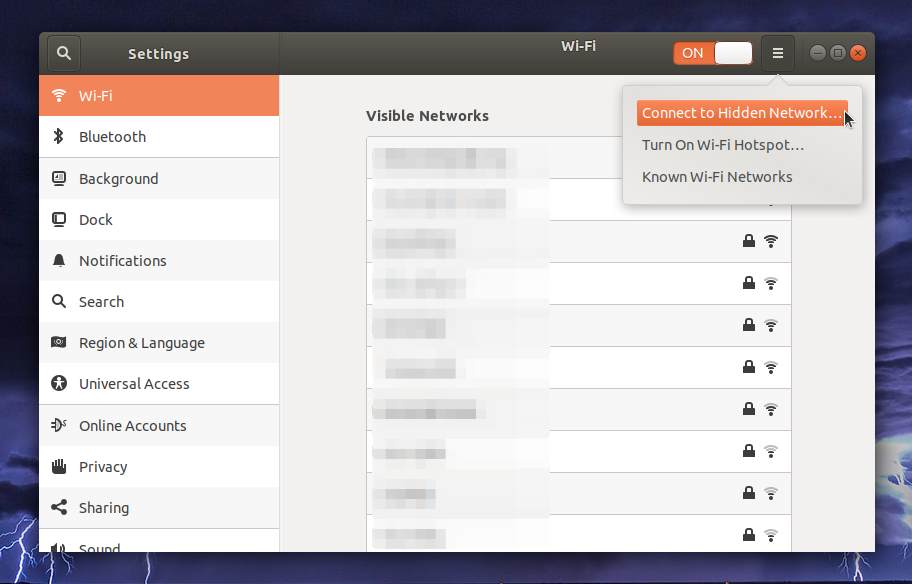
2. Choose Network name as Mac-WiFi and Wi-Fi security as WPA & WPA2 Enterprise.
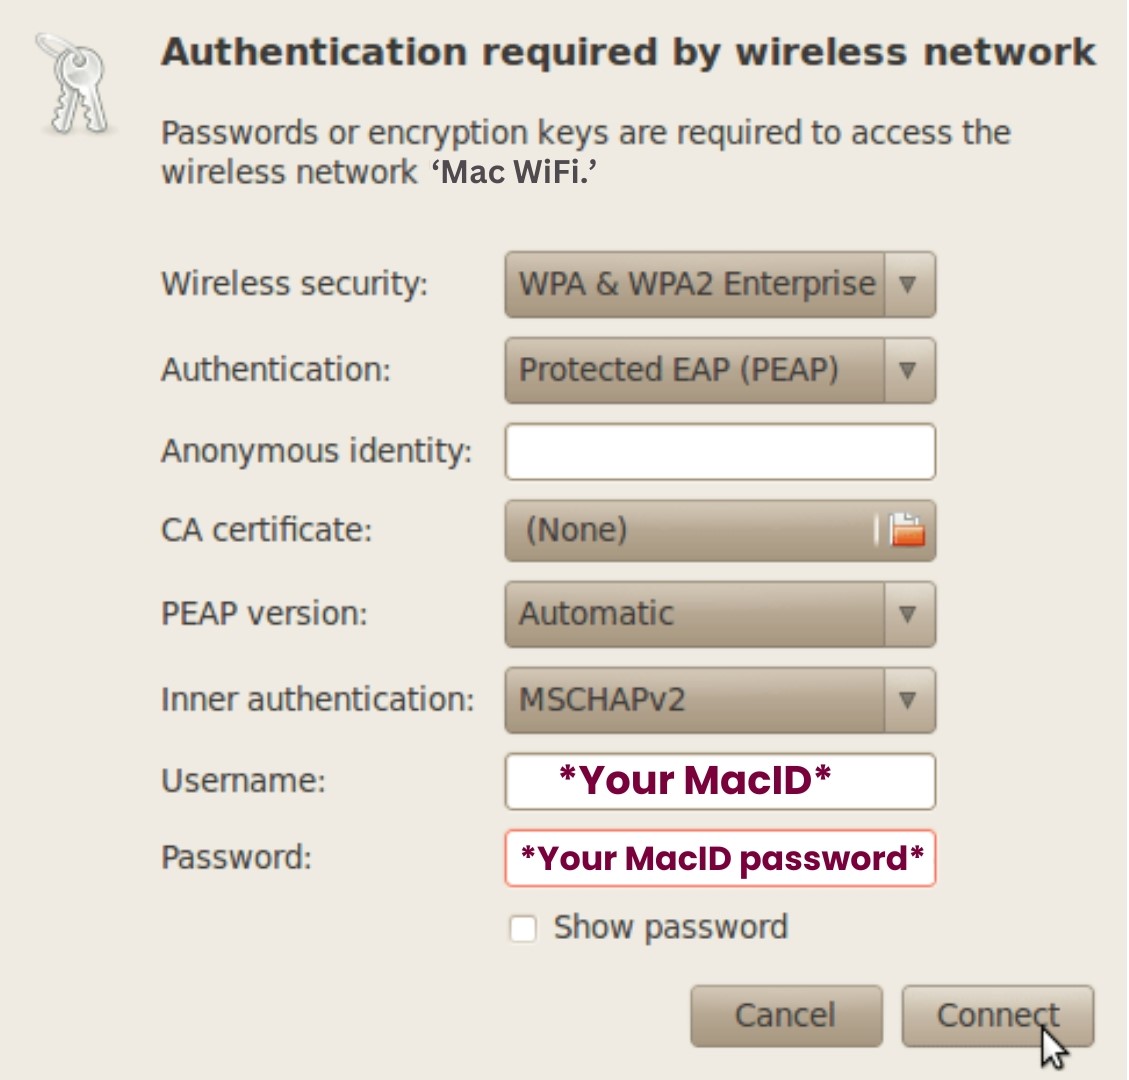
3. Fill in the information as outlined below.
-
-
- Network name: Mac-WiFi
- Wi-Fi Security: WPA & WPA2 Enterprise
- Authentication: Protected EAP (PEAP)
- CA Certificate: No CA certificate is required
- Inner authentication: MSCHAPv2
- Username: Your MacID
- Password: Your MacID Password
- Click on Connect.
-
How to Forget a Wi-Fi Network
There may be minor variations depending on the version used, but steps are very similar.
- Click on the wireless icon in the top right corner of the screen and select the tool icon to open settings.
- Click on the gear icon on the network that you wish to remove.
- A small window should pop up, and automatically be showing the Details tab. Click on the red “Forget Connection” button.
- The network has now been forgotten.
iPhone
Requirements: IPhone or IPad 6.X or later
iPhone/iPad Setup
1. From the home screen, select the Settings icon.
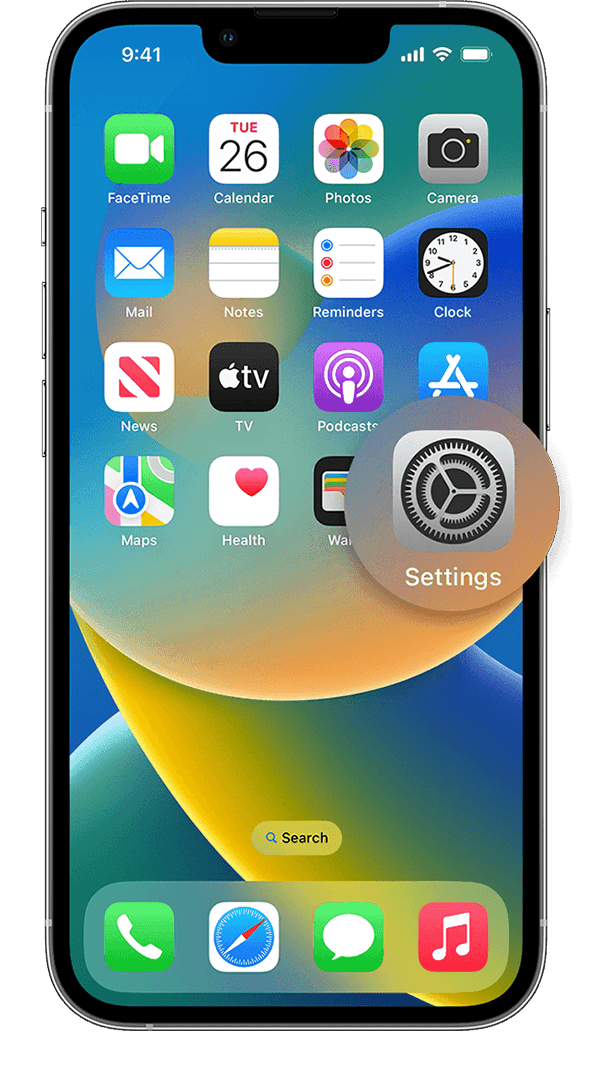
2. Select Wi-Fi and ensure Wi-Fi is turned ON.

3. Select the ‘Mac Wi-Fi’ network and enter your MacID (the part of your McMaster email before the @) and Password.
5.Select ‘Join‘. Once the blue checkmark appears beside the network name, you’re connected!
How to Forget a Network
From the home screen, choose Settings.
In the settings menu, choose Wi-Fi.
Locate the Wi-Fi network to be removed and click the blue symbol next to the name.
If the option to forget the network is available, tap Forget this Network. If that option is not available:
From the home screen, choose Settings.
In the settings menu, choose General.
Locate and tap Profile.
Select the profile for Wi-Fi network to be removed, and tap Delete profile.
Android
Requirements: Android 11
Android Setup
1. From the Home screen, MENU.
2. Choose SETTINGS, CONNECTIONS, Wi-Fi. (Ensure WI-FI is ON)
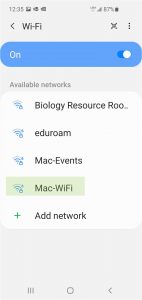
3. Under available find and tap the network named Mac-WiFi.
4. Ensure the following information is correct (not all settings appear on all devices):
- EAP Method: PEAP (selected by Default)
- Phase 2 authentication: Choose MSCHAPV2 (Default – may not appear on all phones)
- Identity: Enter your MacID
- Anonymous Identity: Leave BLANK (may not appear on all phones)
- Password: Enter your MacID password
- CA Certificate: Use System Certificates (this is mandatory with Android 11. Older Android phones may need to select DO NOT VALIDATE, instead).
- Domain: wireless.mcmaster.ca
- Auto reconnect (enable or disable, depending on your preference)
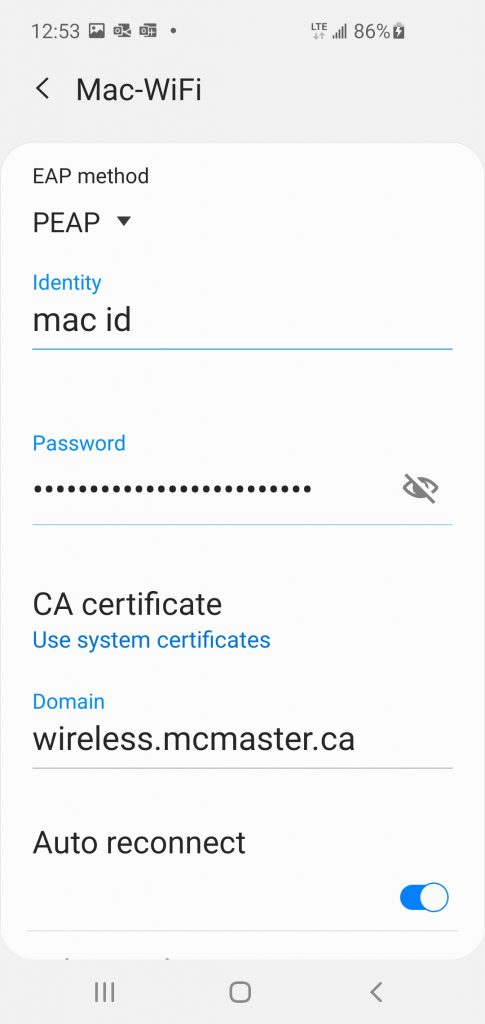
5. Choose CONNECT
6. You are now connected to the WPA-enabled McMaster Wireless network on your Android device.
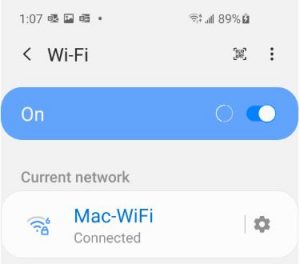
How to Forget a Network
From the home screen, choose Settings.
In the settings menu, choose Wi-Fi.
Press and hold the Wi-Fi network to be removed, and then choose Forget.
MAC OS
Requirements: Macintosh running macOS 10.12.X or later (Sierra); Airport wireless card and software (802.11 compliant)
macOS Setup
1. From top taskbar, click the Wi-Fi icon and select the ‘Mac WiFi’ network.
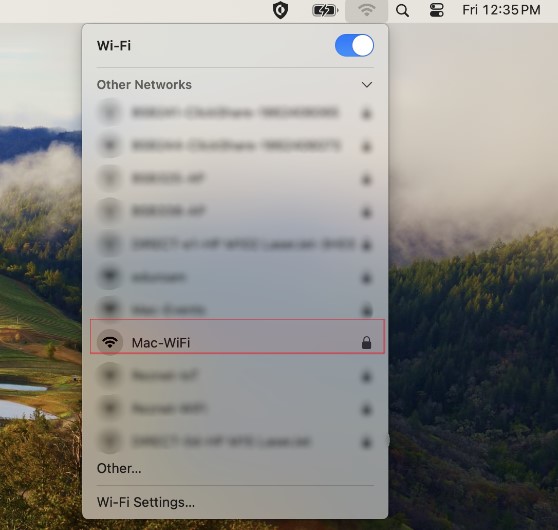
2. Enter your MacID credentials in the popup window.
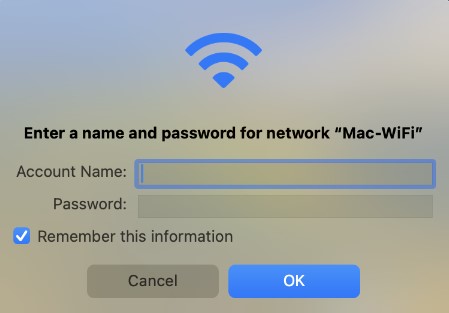
3. Select ‘Continue’ under the ‘Verify Certificate’ popup window.

4. You should now be connected to the Wi-Fi. To confirm, check for a solid black Wi-Fi icon in the top taskbar.

How to Forget a Network
(These steps may require administrator privileges):
1. At the top of your screen, click the Wi-Fi symbol and then select ‘Wi-Fi Settings.’
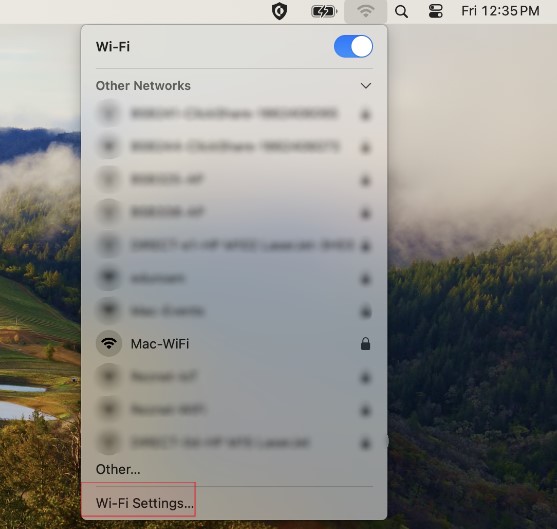
2. In the popup window, find the ‘Mac-WiFi’ network and click on ‘Details’ on the right side.

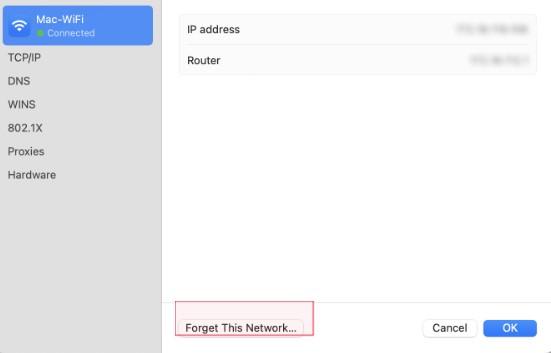
3. Click ‘Forget This Network.’
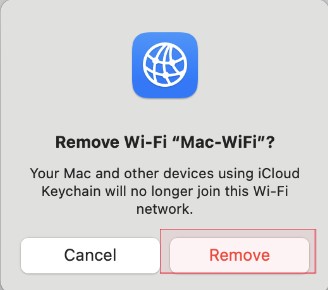
4. Click ‘Remove.’ Your computer should now forget the Mac-WiFi network.
Chromebook
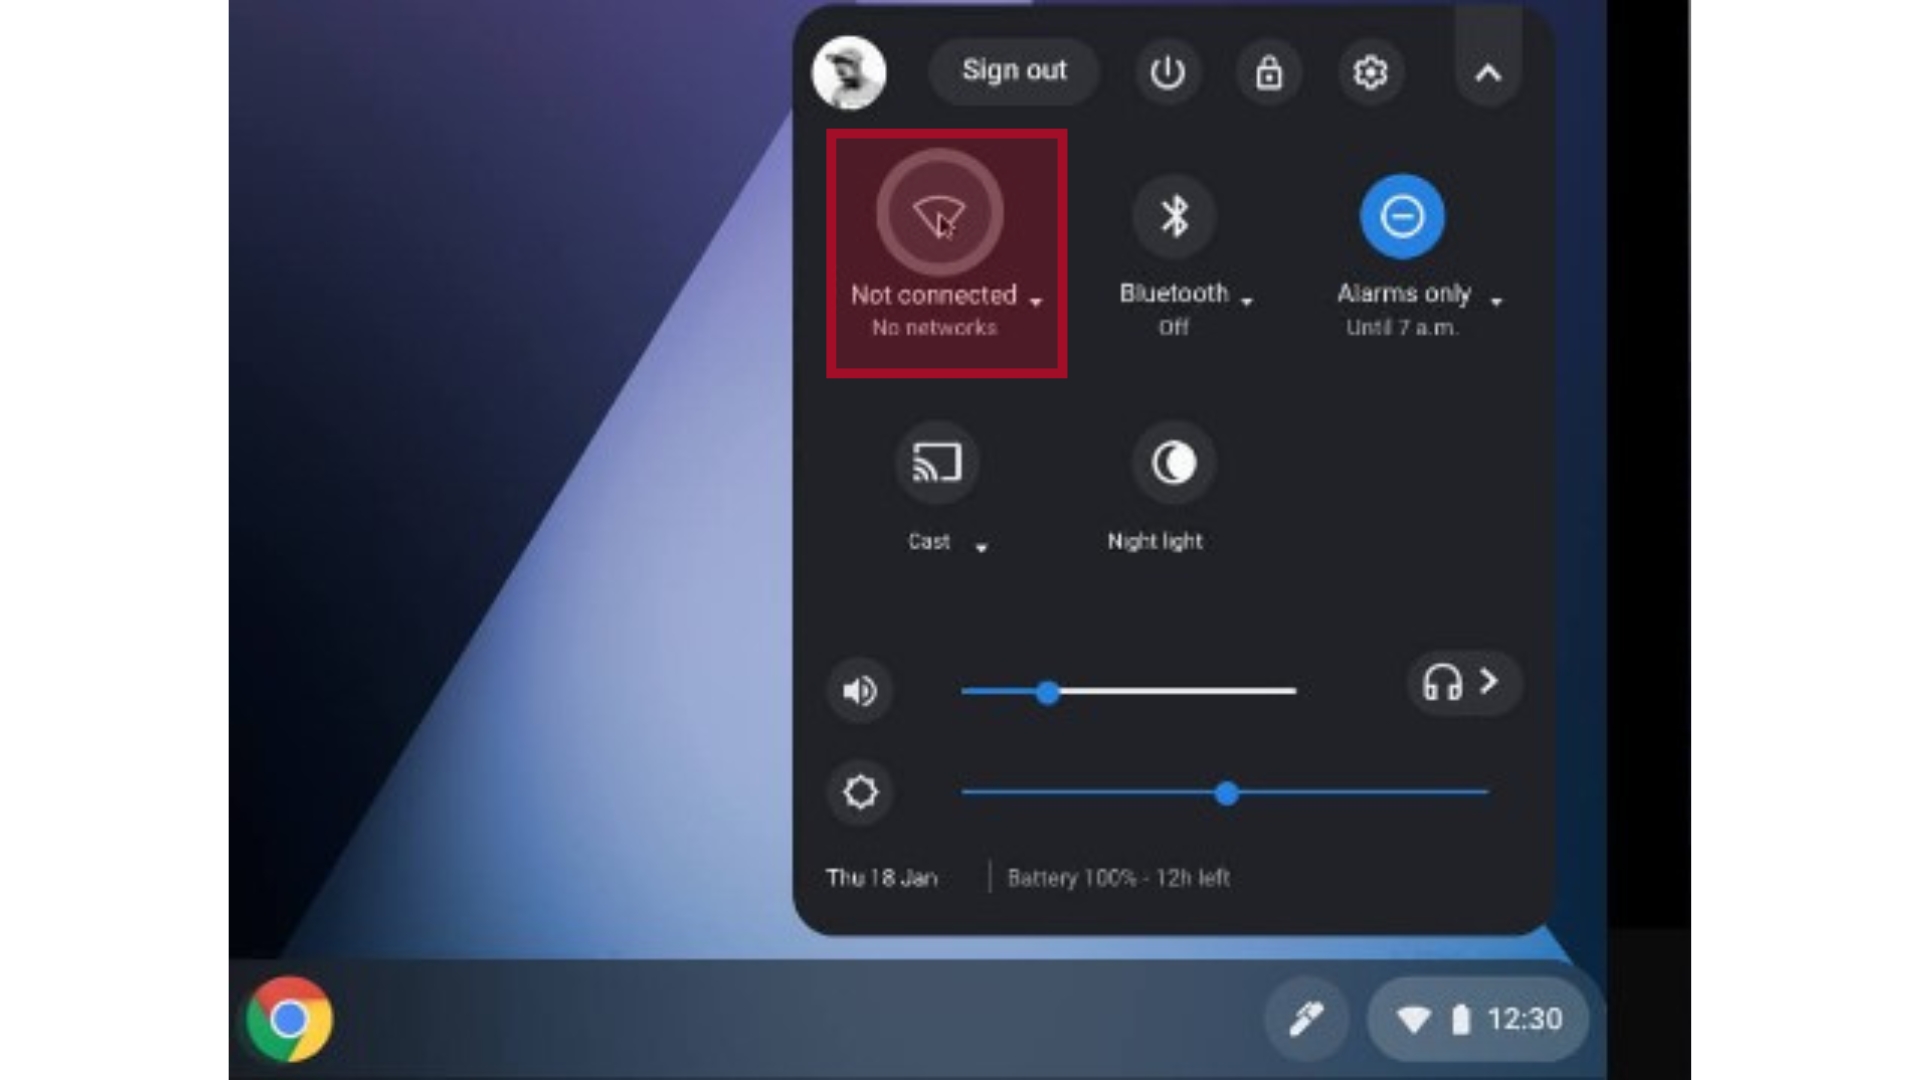
Step 1: Click on the Quick Settings Panel at the bottom right of the screen.
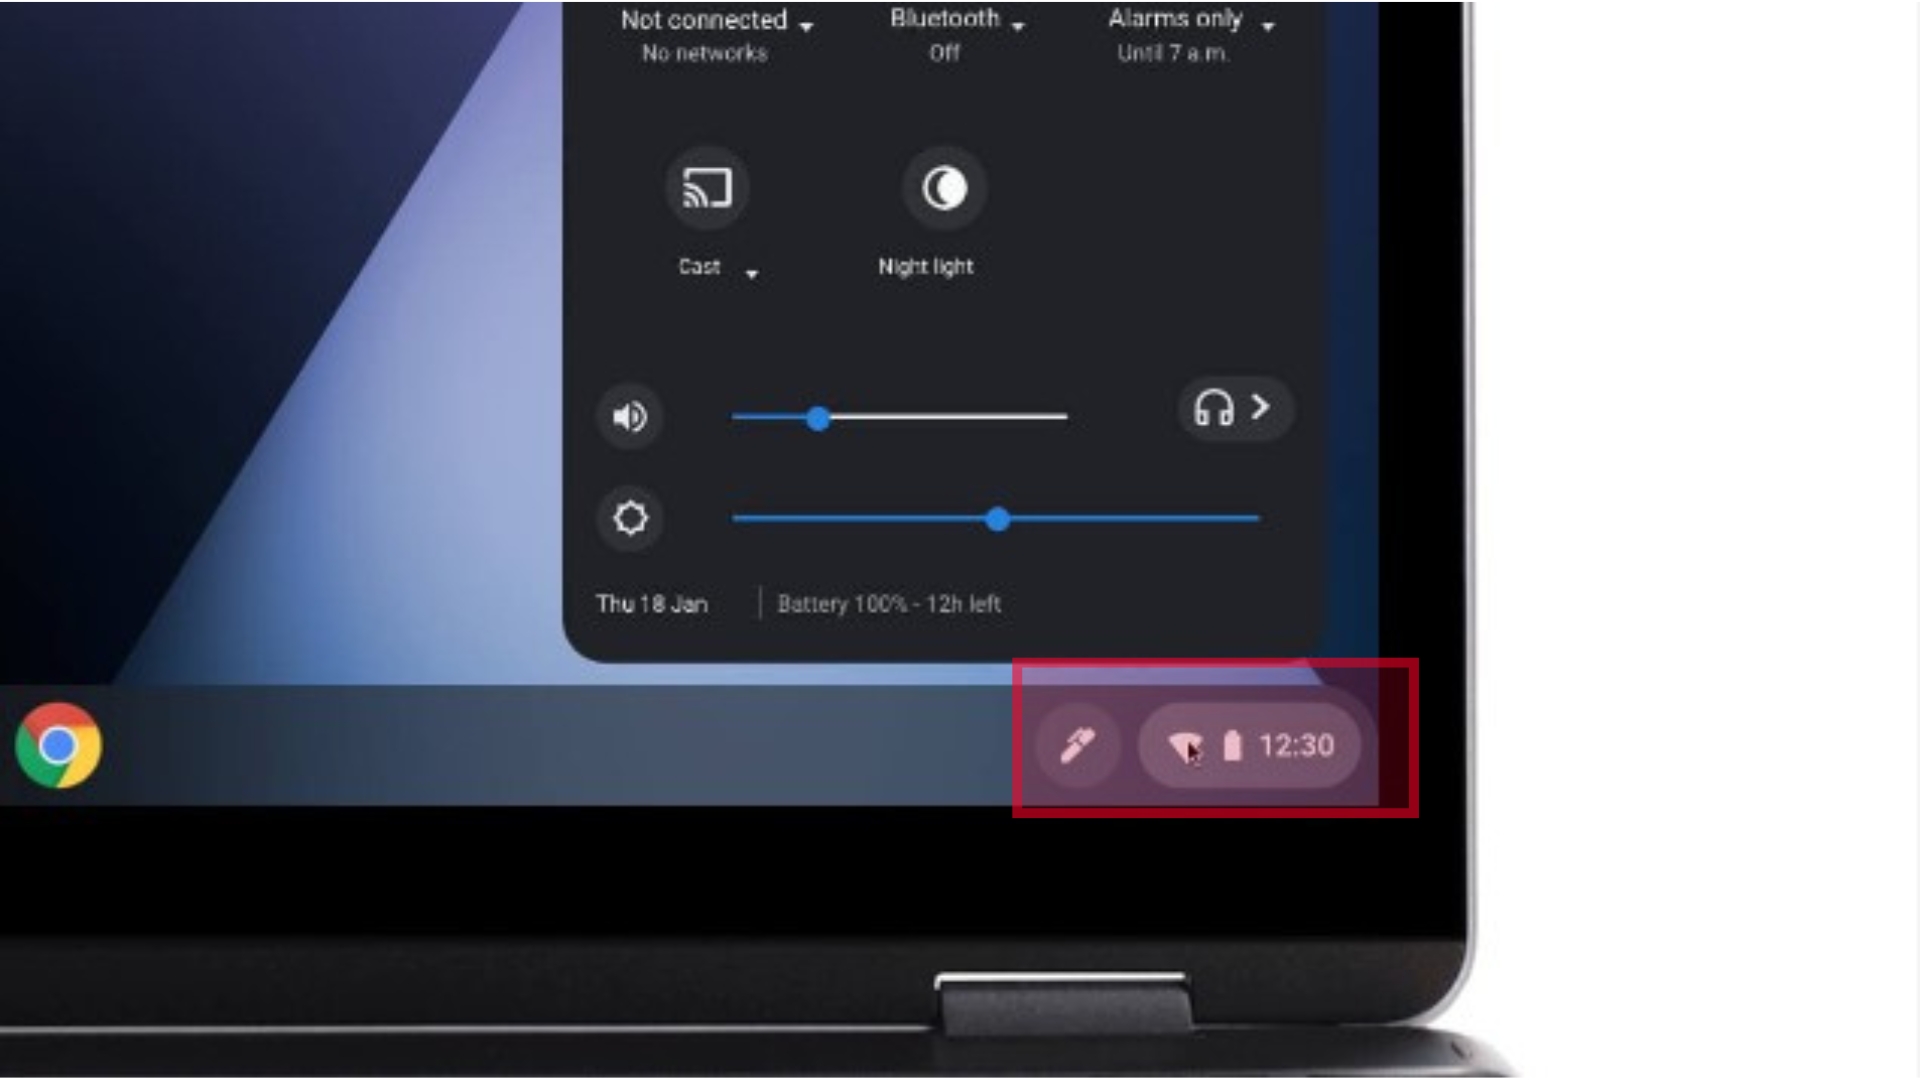
Step 2: Click on the Wi-Fi Icon.
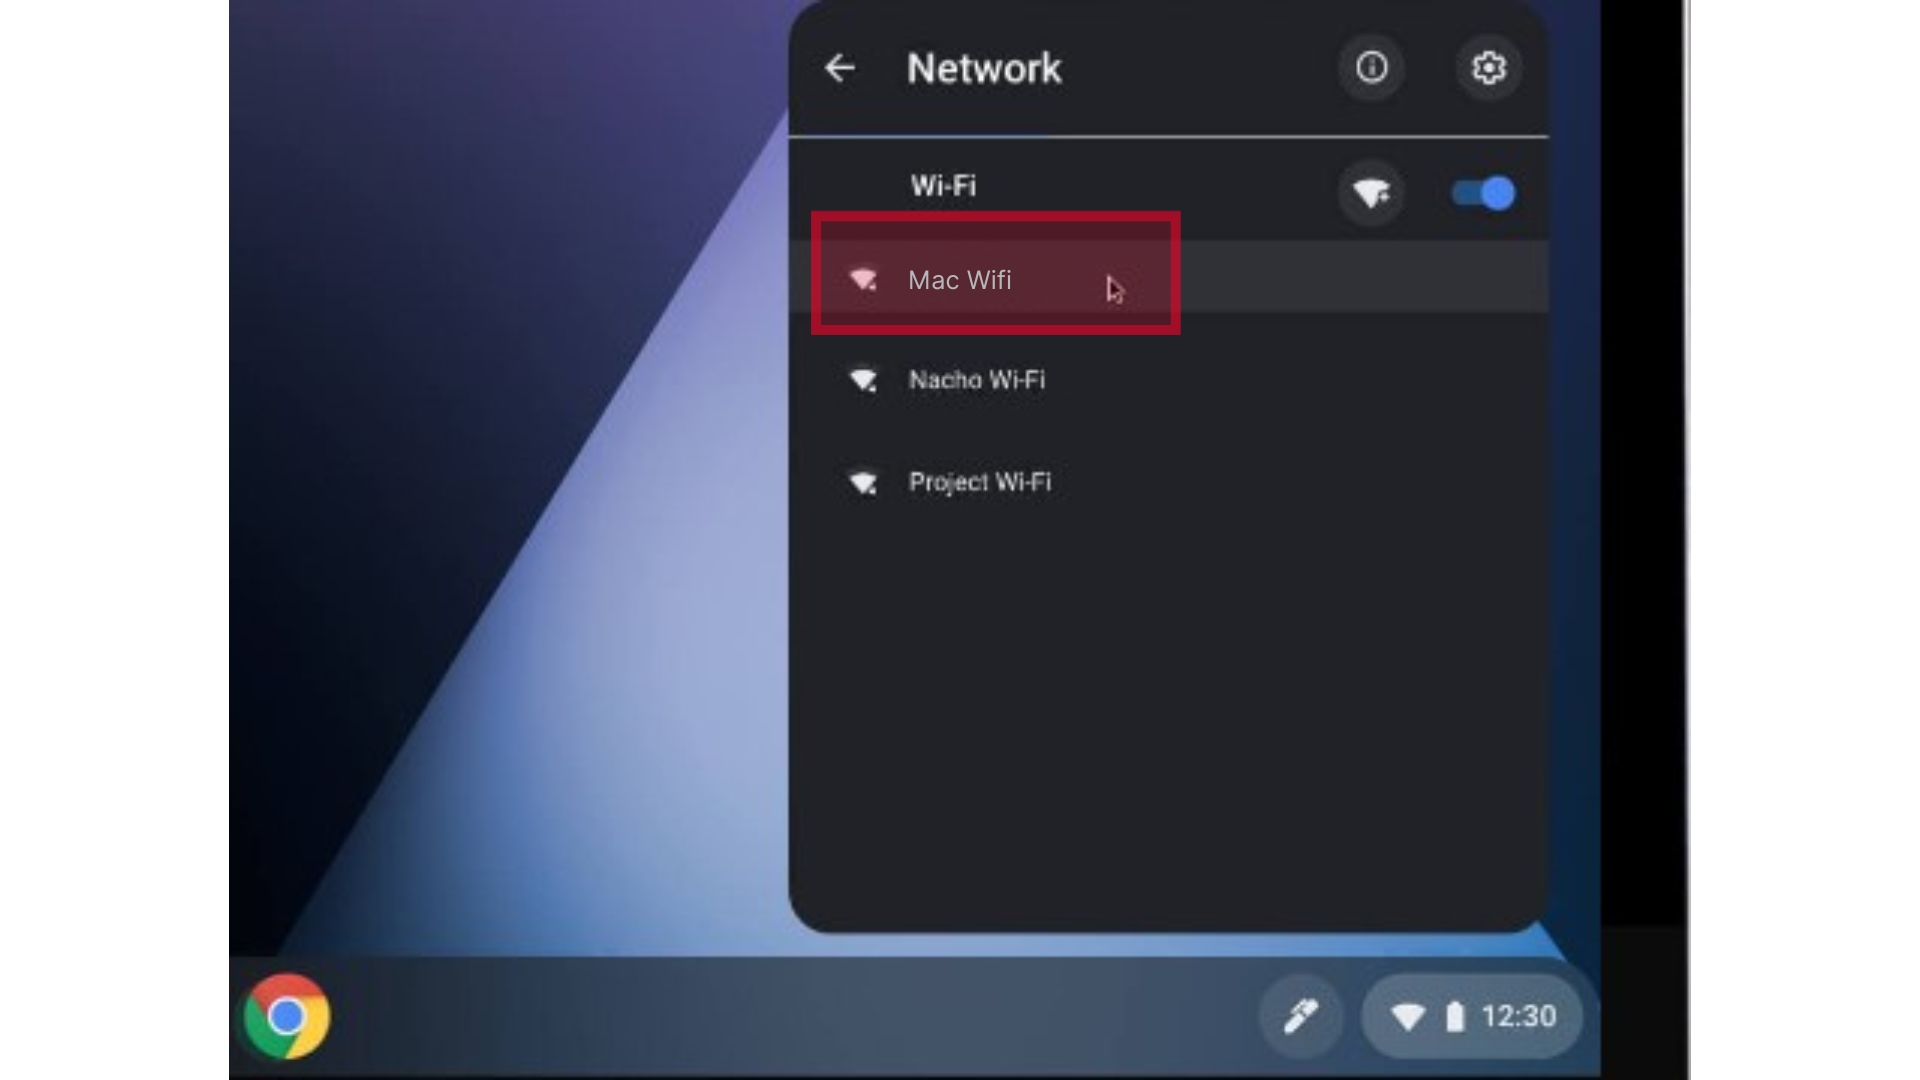
Step 3: Select Mac-WiFi (or Reznet if in dorm room)
Step 4: Use the Following Settings for the Network
EAP method: PEAP
EAP Phase 2 Authentication: MSCHAPv2
Server CA certificate: Do not check
Domain Suffix Match: wireless.mcmaster.ca
Identity/SSID: Your MacID
Password: Your MacID Password
Anonymous Identity: (Leave Blank)
Step 5: Click connect
Reznet-IoT
Reznet-IoT is an un-broadcasted network which allows devices that do not support WPA2-Enterprise, which allows the unsupported devices to connect to wirelessly. To access this network, please fill out a request form.
To access Reznet-IoT please fill out a request form with your name, Mac ID, Mac Address of the device(s), Residence and room number.
In order to connect to the Reznet-WiFi, your device must support WPA2-Enterprise security. Most computers, operating systems, and many devices are supported. You should always attempt to first connect to the Reznet-WiFi network or the attempt to connect to the wired network through the NetReg service refer to the wireless connection instructions but if you have a device that does not support WPA2-Enterprise, McMaster provides a separate un-broadcasted network which allows the unsupported devices to connect to wirelessly. If you need to access this network with an unsupported device, please submit a ticket to UTS with the following details:
- Name
- Mac ID
- Mac Address of the device(s)
- Residence and Room number
Here is a list of devices that have been known to lack WPA2-Enterprise connections:
- Fire Stick
- PetCube
- Smart Televisions
- Kindle Readers, Kobo Readers
- Gaming Consoles such as Xbox, PlayStation, Nintendo Switch
The following devices are not compatible with Reznet-Wifi OR Reznet-IoT
- Wireless Printers
- Home assistant devices such as Alexa, Amazon Echo devices, Google Home etc.
Please note that:
- Reznet-IoT is intended for systems that do not support the authentication system used for Reznet-WiFi. Devices not conforming to the intended usage may be removed without warning.
- Reznet-IoT is not intended for roaming devices. Devices are expected to be located in your bedroom or suite only.
- Reznet-IoT has reduced bandwidth compared with Reznet-WiFi. It is a special purpose network for specific devices that can’t be used on Reznet-WiFi
- Internet Addresses (provided automatically) may change over time.
- This is a service that is in it’s initial stages and cannot guarantee successful connection.
- It is important to note the type of Mac Address that is required. For request to the wired network, the wired Mac Address is needed. For wireless requests, the wireless Mac Address is needed.
Frequently Asked Questions (FAQ's)
A MAC (Media Access Control) address, sometimes referred to as a hardware or physical address, is a unique, 12-character alphanumeric attribute that is used to identify individual electronic devices on a network. An example of a MAC address is: 00:B0:D0:63:C2:26
No. Reznet-IoT is only available in McMaster residences and is not intended for roaming devices.
A wireless printer and the device that it is receiving a print job from should be on the same wireless network. Establishing a physical connection between a printer and the laptop and/desktop would be the ideal way of ensuring printer connectivity.
The Reznet-IoT service is still in its pilot phase so UTS cannot guarantee connection to all devices. But we would be happy to give this new device a shot at the network. Please fill out to form and we can work on it.
The set up instructions for these devices require the device and the smartphone to be on the same wireless network. The Reznet-IoT network is not intended for smart phone, tablets, laptops, or Chromebooks. Users will not be able to make use of this service on home assistant devices.
Eduroam
Eduroam provides roaming wireless network access for external students, staff, and faculty at partner institutions.
What you need to know:
Eduroam provides roaming wireless network access for students, staff, and faculty at partner institutions. Users are able to authenticate using the same credentials as they would at their home institution. McMaster community members can use their MacID to gain access to the eduroam networks at affiliated institutions. Likewise, other institution members can access the McMaster eduroam network using their usual credentials.
All faculty, staff, and students of McMaster University can use the eduroam network at all educational institutes that support eduroam.
When logging into eduroam, users much attach a realm name to their username in order to identify their home institution. For example, McMaster users would append @mcmaster.ca to their MacID when logging into any eduroam network. For example, enter johndoe@mcmaster.ca if johndoe was the MacID. Realm identifiers must always be included when using eduroam.
Each operating system will have a somewhat different configuration. McMaster eduroam network is nearly identical to the Mac-WiFi network. For that reason, the same setup instructions can be used for both. Simply substitute the name eduroam whenever you see Mac-WiFi.
Note: the name is case sensitive and must be entered as lowercase.
McMaster’s eduroam network is intended to be used by visitors from other participating institutions. McMaster staff, faculty, and students must continue to use the Mac-WiFi wireless network already provided.
The network restrictions placed on eduroam is at the discretion of the institution providing the service. At this time McMaster University provides full access to the Internet with the exception of a small number of protocols that have been deemed a security risk. For example, the Microsoft protocols are not routed outside the eduroam network. There is no guarantee that eduroam will provide the same access to resources as the home or visited institution’s standard wireless networks.
Users wishing to connect to eduroam must acquire support from their home institution only. Institutions hosting eduroam connectivity are not required to provide support to visiting guest users. For McMaster University faculty, staff, and students, please contact the UTS Service Desk.
FAQ
Frequently Asked Questions about Wi-Fi at Mac
Expandable List
Mac-WiFi, Rez-Net, & Eduroam.
Mac-WiFi is the recommended network at McMaster and it is secure. Authentication is done using the Enterprise variant of WPA2, also known as 802.1x and uses the strongest encryption available for wireless networks. MacSecure will be phased out in spring 2020.
MacSecure was phased out in spring 2020 and you should be able to see Mac-WiFi as the preferred network.
Importantly, you might need to “forget” the MacSecure network to automatically connect to the preferred Mac-WiFi. To do this, click on your device’s Network Settings, and then Manage Wi-Fi settings. There should be an option to “forget” the network profile.
- Use Mac-WiFi.
- Ensure you have at least 3 bars of signal strength (4-5 is best).
- Make sure you are on the best AP possible by disconnecting and reconnecting when you arrive at your usage destination. Client devices control when they change Access Points and tend to hold on to a connection that is poor even when a better one is available.
- Ensure that your WLAN drivers are up-to-date from the manufacturer web site.
- If possible, avoid highly congested areas. Crowded areas are naturally going to decrease WiFi performance.
- No, a VPN is not required with any of the McMaster networks. You should only use a VPN when you have been given specific instructions to do so.
Forgetting a wireless network can be helpful when troubleshooting wireless network problems or if you have changed your MAC ID password and need to re-enter it for wireless access. This article provides instructions on how to forget a wireless network on various operating systems and device types.
Follow these instructions to remove Mac-WiFi or eduroam networks from your device.
On Desktop
Windows 10
To forget a wireless network in Windows 10:
- At the bottom right in the system tray, click the network icon and choose Network & Internet settings.
- Click Manage Wi-Fi settings. Under “Manage known networks”, select the Wi-Fi network to be removed.
- Click Forget.
MacOS
To forget a wireless network in macOS (these steps may require administrator privileges):
- At the top of your screen, click the Wi-Fi symbol and then select Open Network Preferences.
- In the lower right, choose Advanced.
- Under “Preferred Networks”, select the Wi-Fi network to be removed.
- Click – (the minus sign) to forget the network.
- Click OK.
On Mobile:
Android
To forget a wireless network on your Android mobile device:
- From the home screen, choose Settings.
- In the settings menu, choose Wi-Fi.
- Press and hold the Wi-Fi network to be removed, and then choose Forget.
IOS
To forget a wireless network on your iPhone or iPad:
- From the home screen, choose Settings.
- In the settings menu, choose Wi-Fi.
- Locate the Wi-Fi network to be removed and click the blue symbol next to the name.
- If the option to forget the network is available, tap Forget this Network.
If that option is not available:
- From the home screen, choose Settings.
- In the settings menu, choose General. Locate and tap Profile.
- Select the profile for Wi-Fi network to be removed, and tap Delete profile.
